Skip to content

DIY digital piano: a janko variant

Mike Filip

Hello everyone;

Ive gotten into a bit of a rabbit hole last year that started with learning chords and improvisation, continued to music theory and isomorphic keyboards, and spiraled out of control into janko keyboard layout and a DIY project for a fully custom digital piano with realistic (or as realistic as I can get) action.

Gotten to the point I have a prototype action (with sensors and everything) working, so I started posting some progress reports and putting together youtube videos about the project.

Some of the posts here (CyberGene's original designs and the stem-piano) were exceptionally useful, though I ended up going with something different for the electronics.

I cant exactly post images here yet, but I wanted to start this post to talk about the design as well as post updates, along with the following locations:


Facebook Group:

Its a janko piano group, but due to the nature of isomorphic layouts Im pretty sure nearly everyone is a bit of a DIYer here. Have also been lurking in the background the past year and only recently started posting about the progress. Its got some pictures of the design right now, plus a couple videos.

Youtube Channel:

I just recently put it together, so at the moment it just has a single 'promo' clip that I will be using as the opening or intro to the other videos; but I plan to start adding the actual videos to the channel after new years. Already got a couple clips talking about the project, janko layout, and the piano action; just need to finish editing them.


About the design (Janko Layout)

So I am a bit of a self-taught pianist, having started playing piano in university when I transitioned to it from guitar (for which I did have a year or so of lessons, though none of it focused on theory). Up until now I relied mostly on learning pieces through muscle memory and 'hearing' when a note sounded wrong in context. Last year I decided to learn music theory so as to be able to learn pieces 'better', which lead to 12TET tuning and isomorphic keyboards.

The Janko layout was where I ended up - its an alternative piano layout invented in 1882 with was supposed to be the 'next big thing', so much so that even Franz Liszt thought it would it would take over the piano market… but yea - turns out that switching keyboard layouts isnt easy. Since then there have been several attempts at a similar concept, but obviously nothing can push the piano off its pedestal.

PS: quick explanation about isomorphic layouts:

the 'big idea' is that on a regular piano (which is non-isomorphic) you have to memorize 6 different positions for each chord - so a C major is all white keys, while D major is white-black-white, and so on. This makes transposing a song (or a piece of a song) difficult as the fingering will be completely different, and makes it less intuitive to play (same shape corresponds to different intervals, so at least personally this meant that as I was memorizing pieces I could remember which keys to press, but not recognize that I was playing an F major arpeggio).

With a janko layout (as with all isomorphic keyboards), the 'shape' of a given chord is the same - so if you play a C major and want to play a D major you just have to shift your fingers one key down the keyboard without modifying your hand's shape (C# would be the same shape, but up on a diagonal).

For a 'simpler' isomorphic keyboard think about what would happen if you moved the white keys C,D,E into the back row and the black keys C# and D# into the front row (so your 12 key octave will have 6 keys on the front and 6 on the back - here is an example); so a C major would be upper-upper-lower shape, and D major would also be upper-upper-lower (C# would be lower-lower-upper… so not true isomorphic, but instead of 6 shapes you have 2 mirrored shapes - bit easier to remember; the janko is basically this concept just with adding more rows of the same keys so as to make 1 shape instead)


About the action (Hickman action)

After trying out a bunch of digital pianos in the shop I came away preferring the acoustic actions, so ones like Novus NV10 and similar. Once I started working on the DIY project it seemed only natural to try and incorporate that instead of going with the simple 'weighted hammer' approach.

This posed issues, as the janko layout necessitated narrower action (in the acoustic janko layout the piano keys were placed on angled levers to shrink the octave span, but I figured just narrower action parts would be easier), meaning I had to make custom action parts… which would be difficult with the complexity of the Erard double escapement action. Around the time I was starting my design in fusion 360 I came across the hickman action. This offered a much simpler design while retaining the 'realistic grand action feel' that I was chasing, so I pivoted to it instead.

This did end up meaning that I had to learn all about key guide pins, center pins, action bushings, and all the rest…

So now my workshop is a mess of piano felt + hardware and 3d printed parts + tools.

The action did turn out to work beautifully, so I have that going for me at least.


About the electronics

Initially I took inspiration from CyberGene's work and started working on an 8 key double-optical slit sensor board that would be connected in series with a main board that would scan through each board consecutively to read the sensors, but one thing lead to another and I ended up with each 8-key sensor board having both 2x optical sensors to pick up hammer velocity and a hall-effect magnetic sensor to read the (analog) key position (so 16 optical + 8 magnetic sensors). These sensors would be read by a dedicated STM32 microprocessor that would talk via 2x SPI channels to the boards to the left and right of it, with a single 'controller' board placed at one of the ends that would 'request' key data (with that request being echoed by each board down the line), and the receive the data (once again, echoed by each board back to the controller). The controller would then package that data into a MIDI format, accounting for things such as velocity curves and pedal input.

Essentially the sensor boards would be in charge of keeping track of the key states and accurately measuring the velocities with timing down to a couple microseconds, while the controller would just get a 'key press' or 'key release' data every millisecond or so and send it as MIDI to the mini-pc running pianoteq.


Current state of the project

At the moment I have finished the final design of the 8-key prototype and am printing out the parts needed for a full piano. I have the prototype working with the control board & mini PC running pianoteq, though with only 8 (chromatic) keys Ive only really got the first 5 notes of the A major scale to play with - enough to play the 'beginner' version of ode-to-joy, but not much else.

Ive taken the prototype over to a piano technician in the Toronto area, which they marked as being 'quite good, almost feels like an acoustic grand', though we did spend quite a bit of time tuning the letoff mechanism in-shop.

As of right now I am mostly taking the time to finish up the videos talking about the project instead of working on the finished build, mainly because I have thoughts of making a 'timelapse' video of it being put together, which means I need to knock out the other videos first…


Design files and CADs

I have plans to release the fusion 360 files along with the electronic board designs (made in easy eda), though at the moment its all just stored locally on my computer (or at least as 'locally' as fusion 360 and easy-eda with their cloud storage can be). I think I can make them 'publicly viewable', but doing anything like that is just extra work on top of this project so it depends on when I get around to it.
CyberGene

Mike Filip welcome to the forum. That Hickman action looks very interesting and elegant! Looking forward to seeing more of your work. You should be able to upload pictures now.


Mike Filip

So here is a couple pictures & explanations of the project!


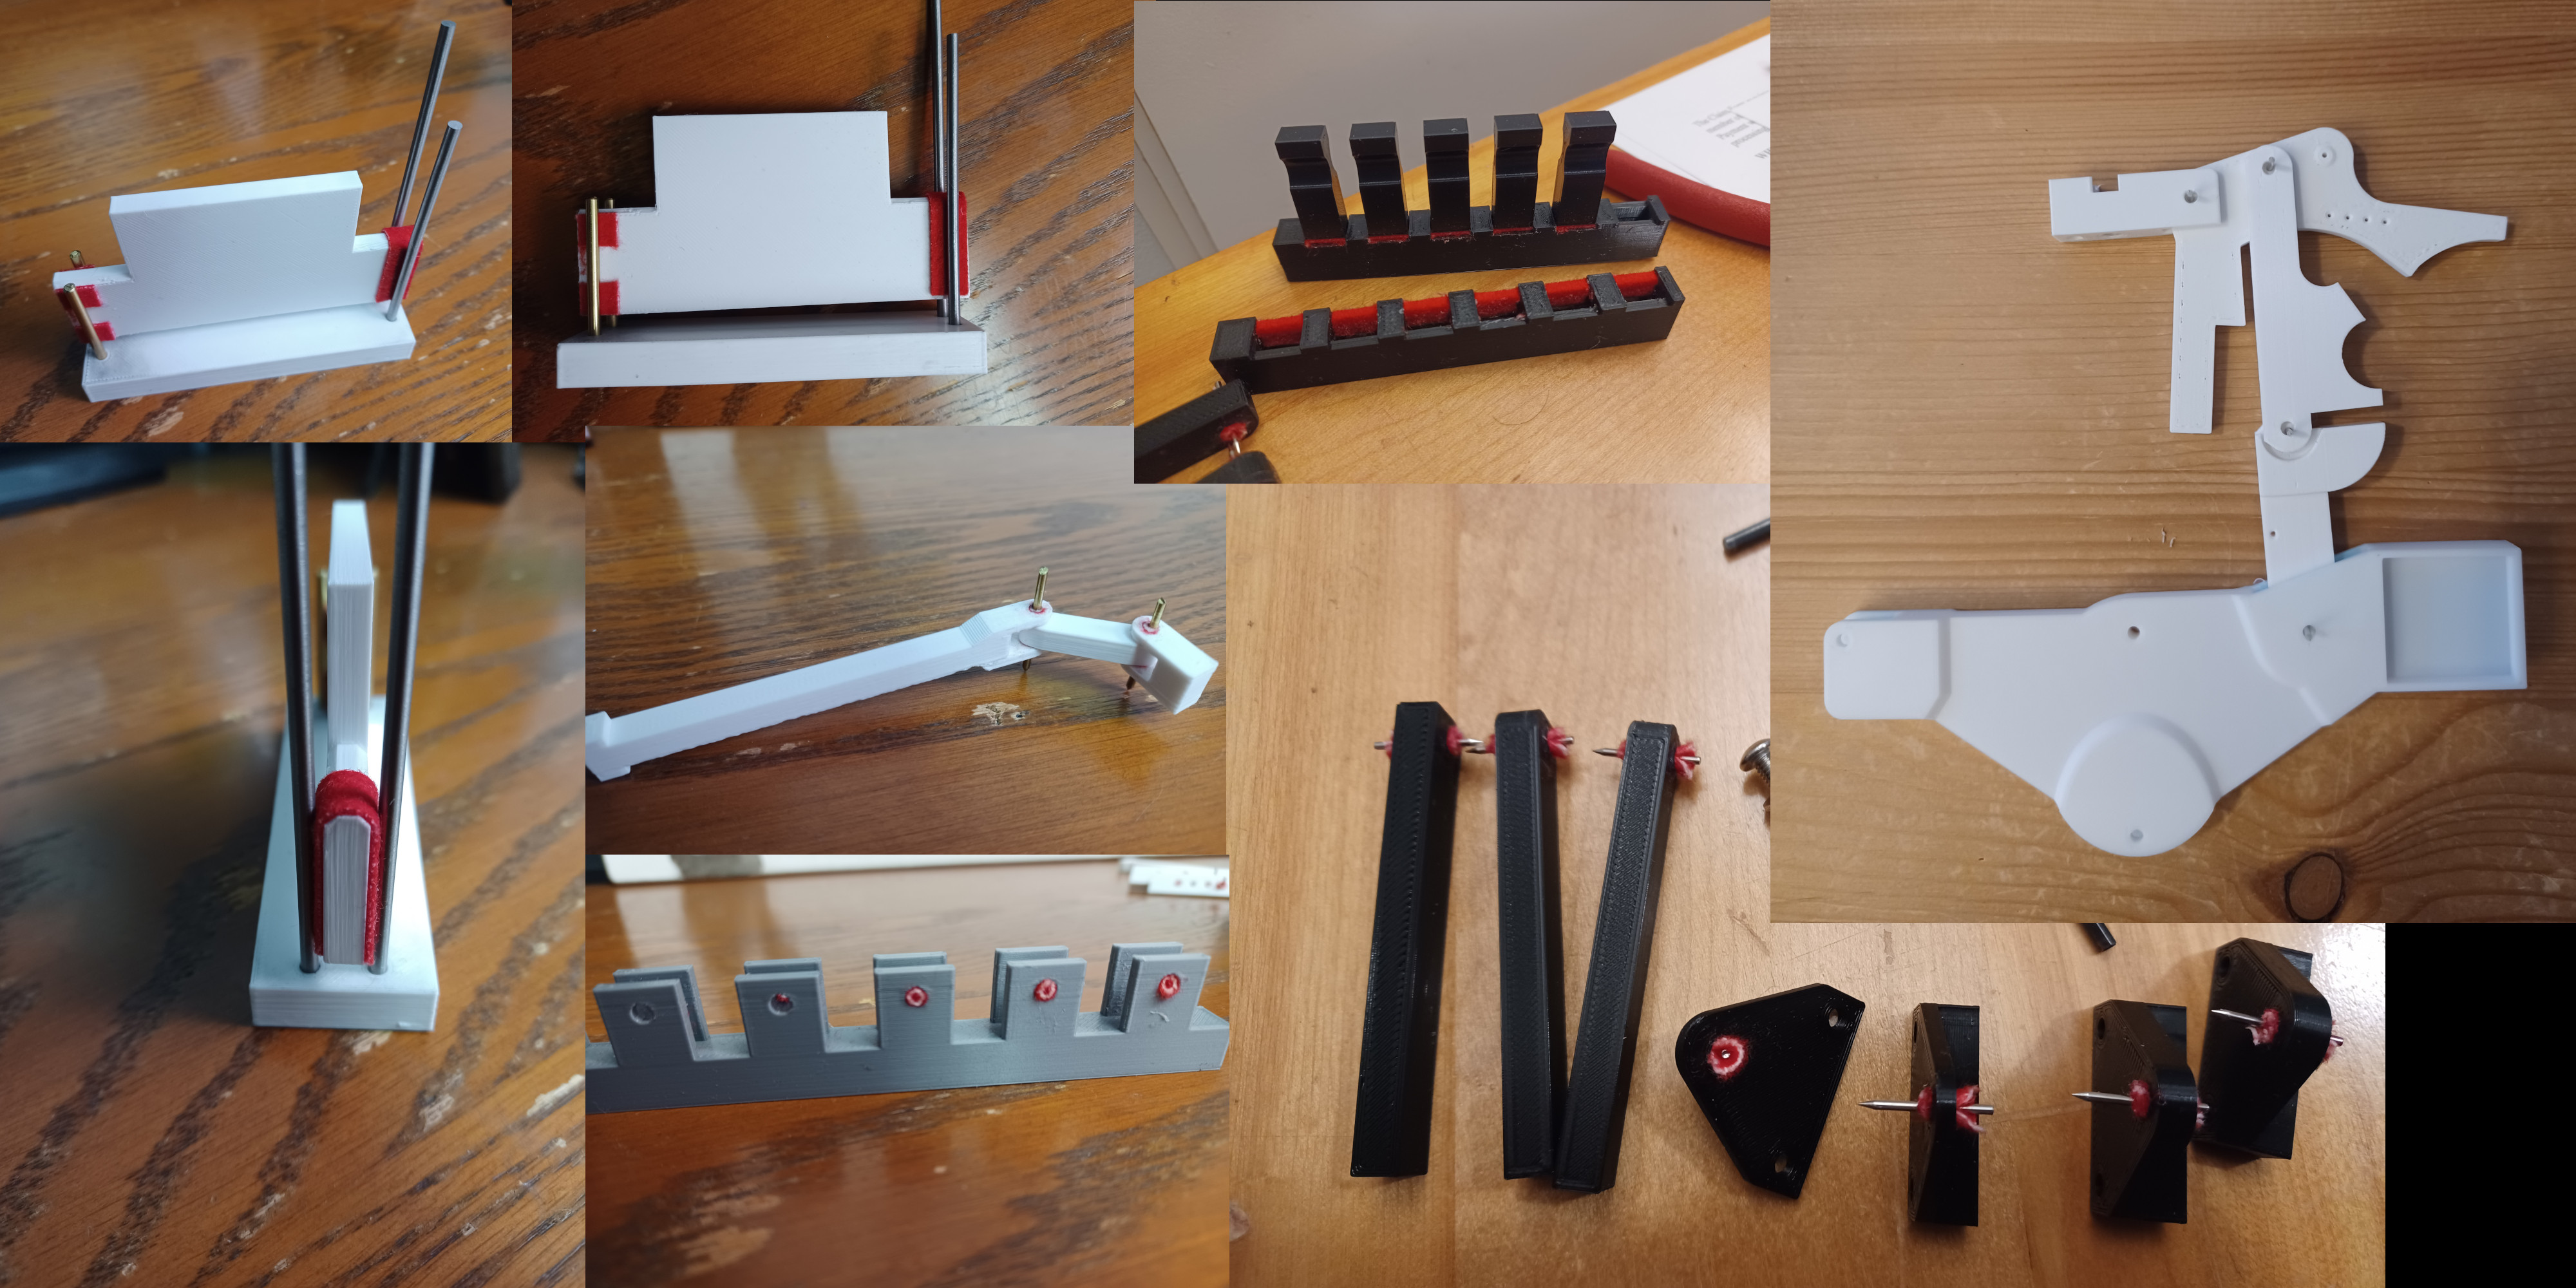
Initial prototyping and test prints

I started out thinking I could minimize costs by not using actual piano guidepins and center pins. This didnt last long as I realized that sanding and polishing a 3mm rod to spec was a huge pain, and not something I wanted to do a couple hundred times. So I ordered a bunch of guidepins and center pins via aliexpress and started working on the hickman action.


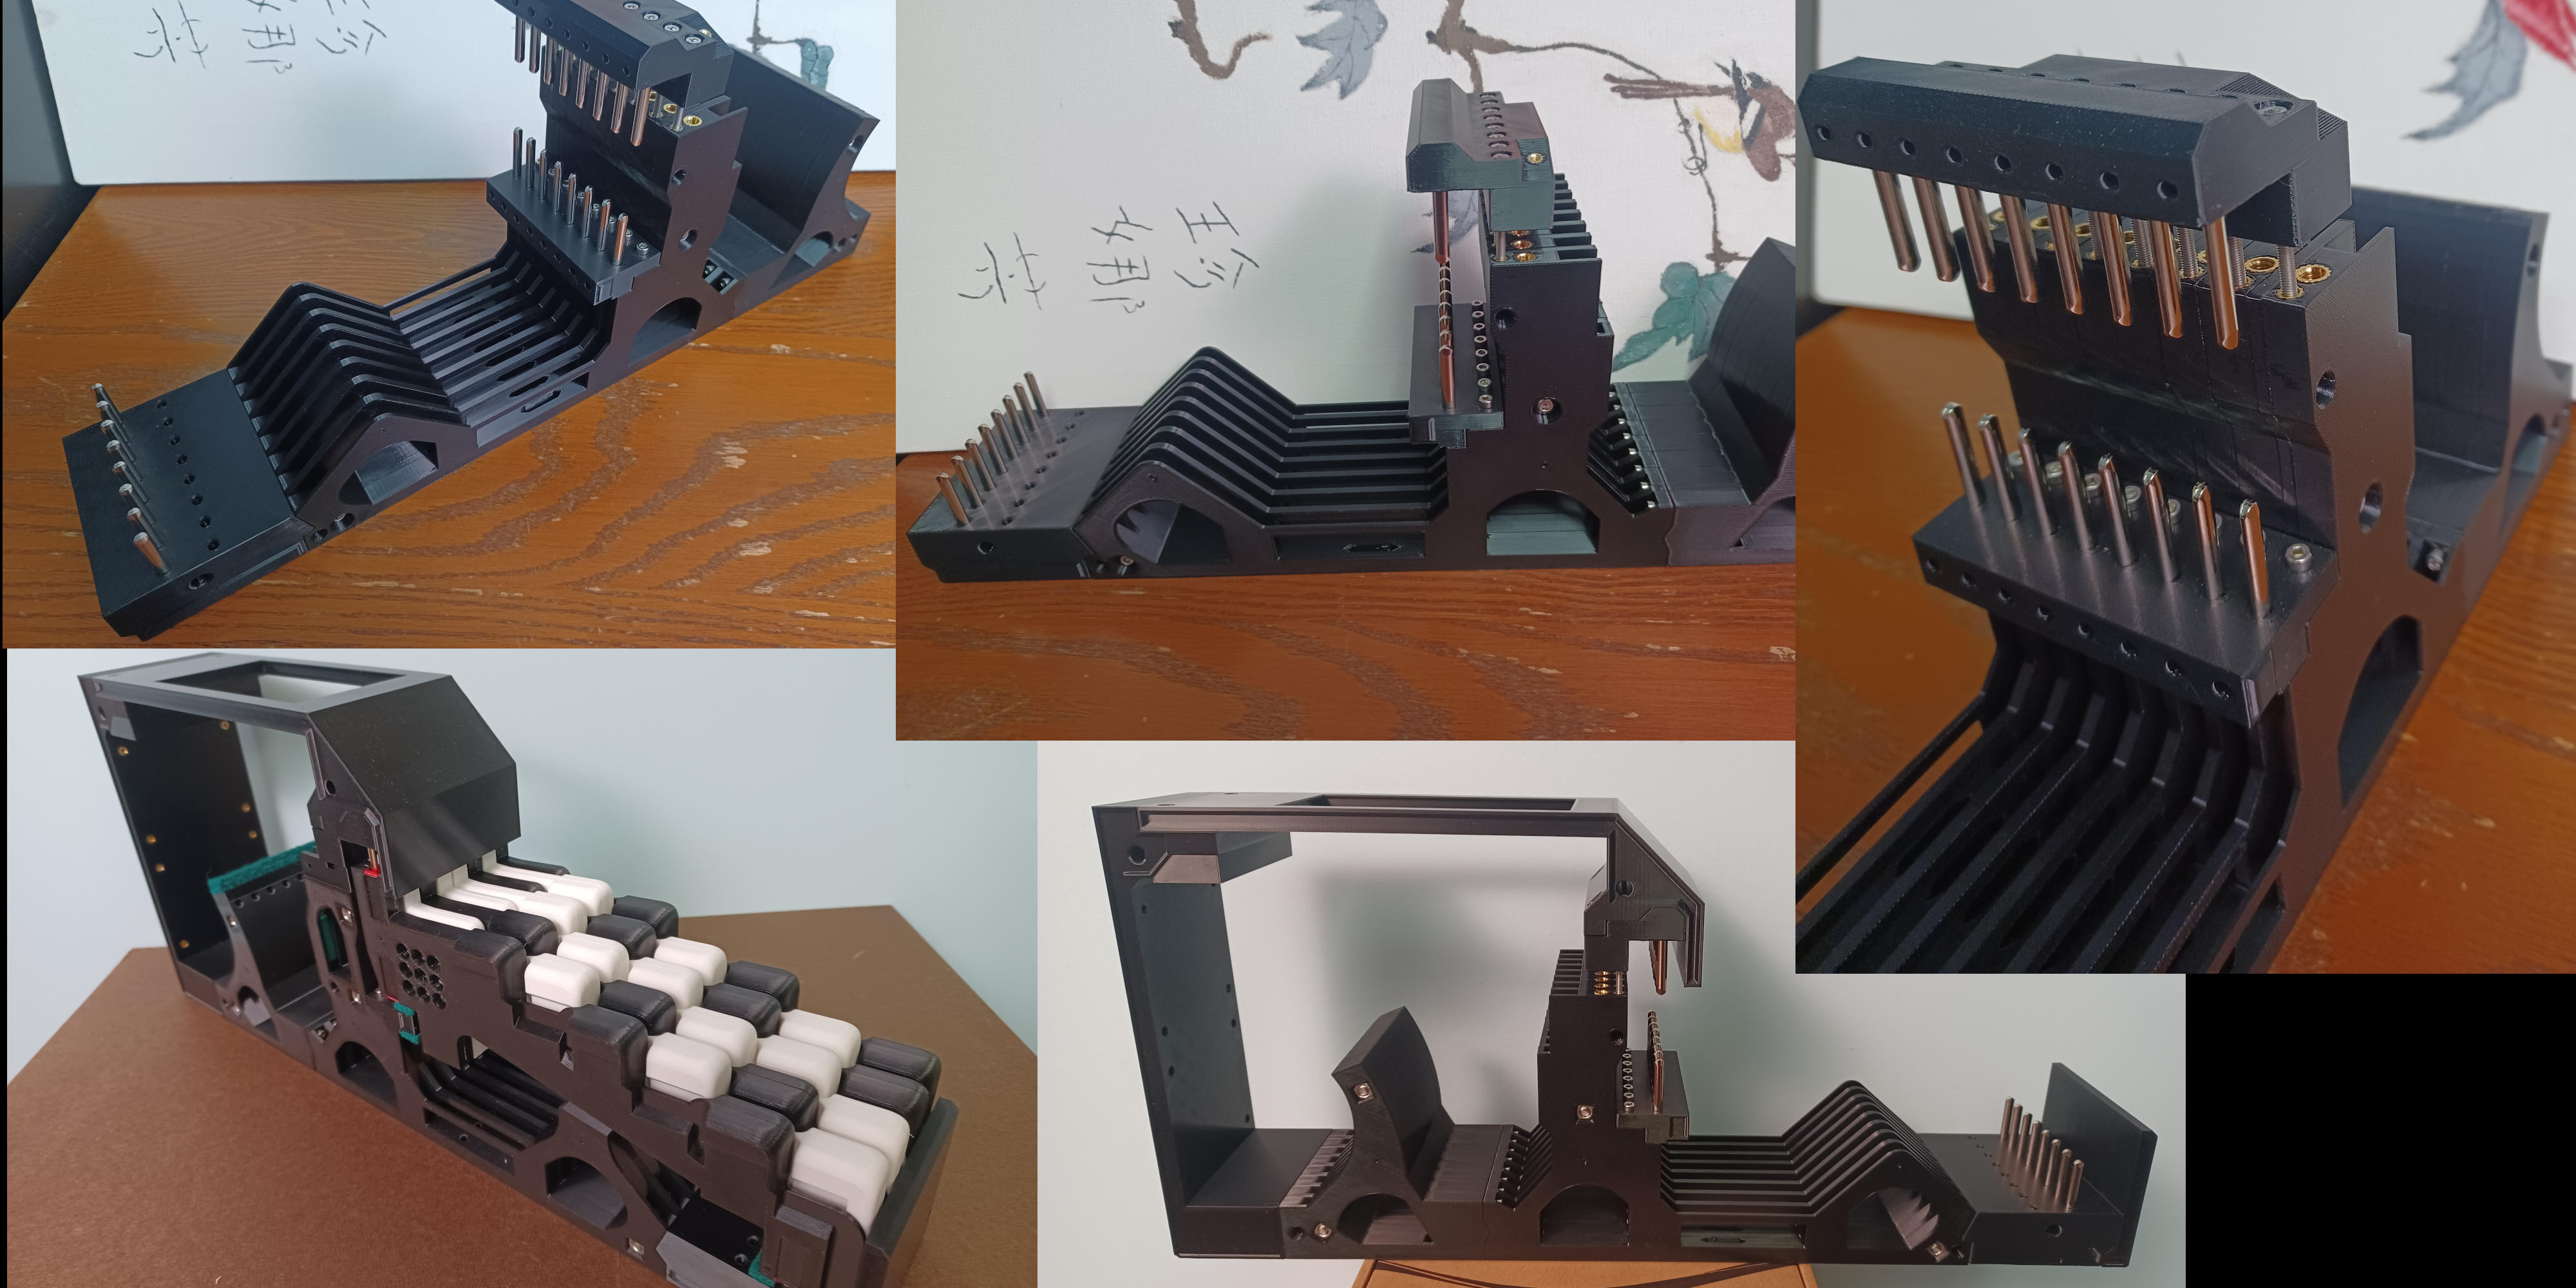
Framework

I got most of the action through the 'initial CAD drawing' phase within a couple months and started working on the framework, thinking it would be best to get that into 'printable' order before continuing. That plus the keys were a bit on the 'easy' side…


Key levers

This isnt really a part of a regular piano design, but part of the janko layout is the parallelogram structure that makes the keys dip down evenly no matter where you press on them - ensuring an even 9.5mm dip throughout the entire key. This theoretically makes playing the piano easier as you dont have to adjust the force of your playing based on if you are pressing at the front of the keys or along the back (and account for how different pianos have different key lever lengths)


Hickman Action

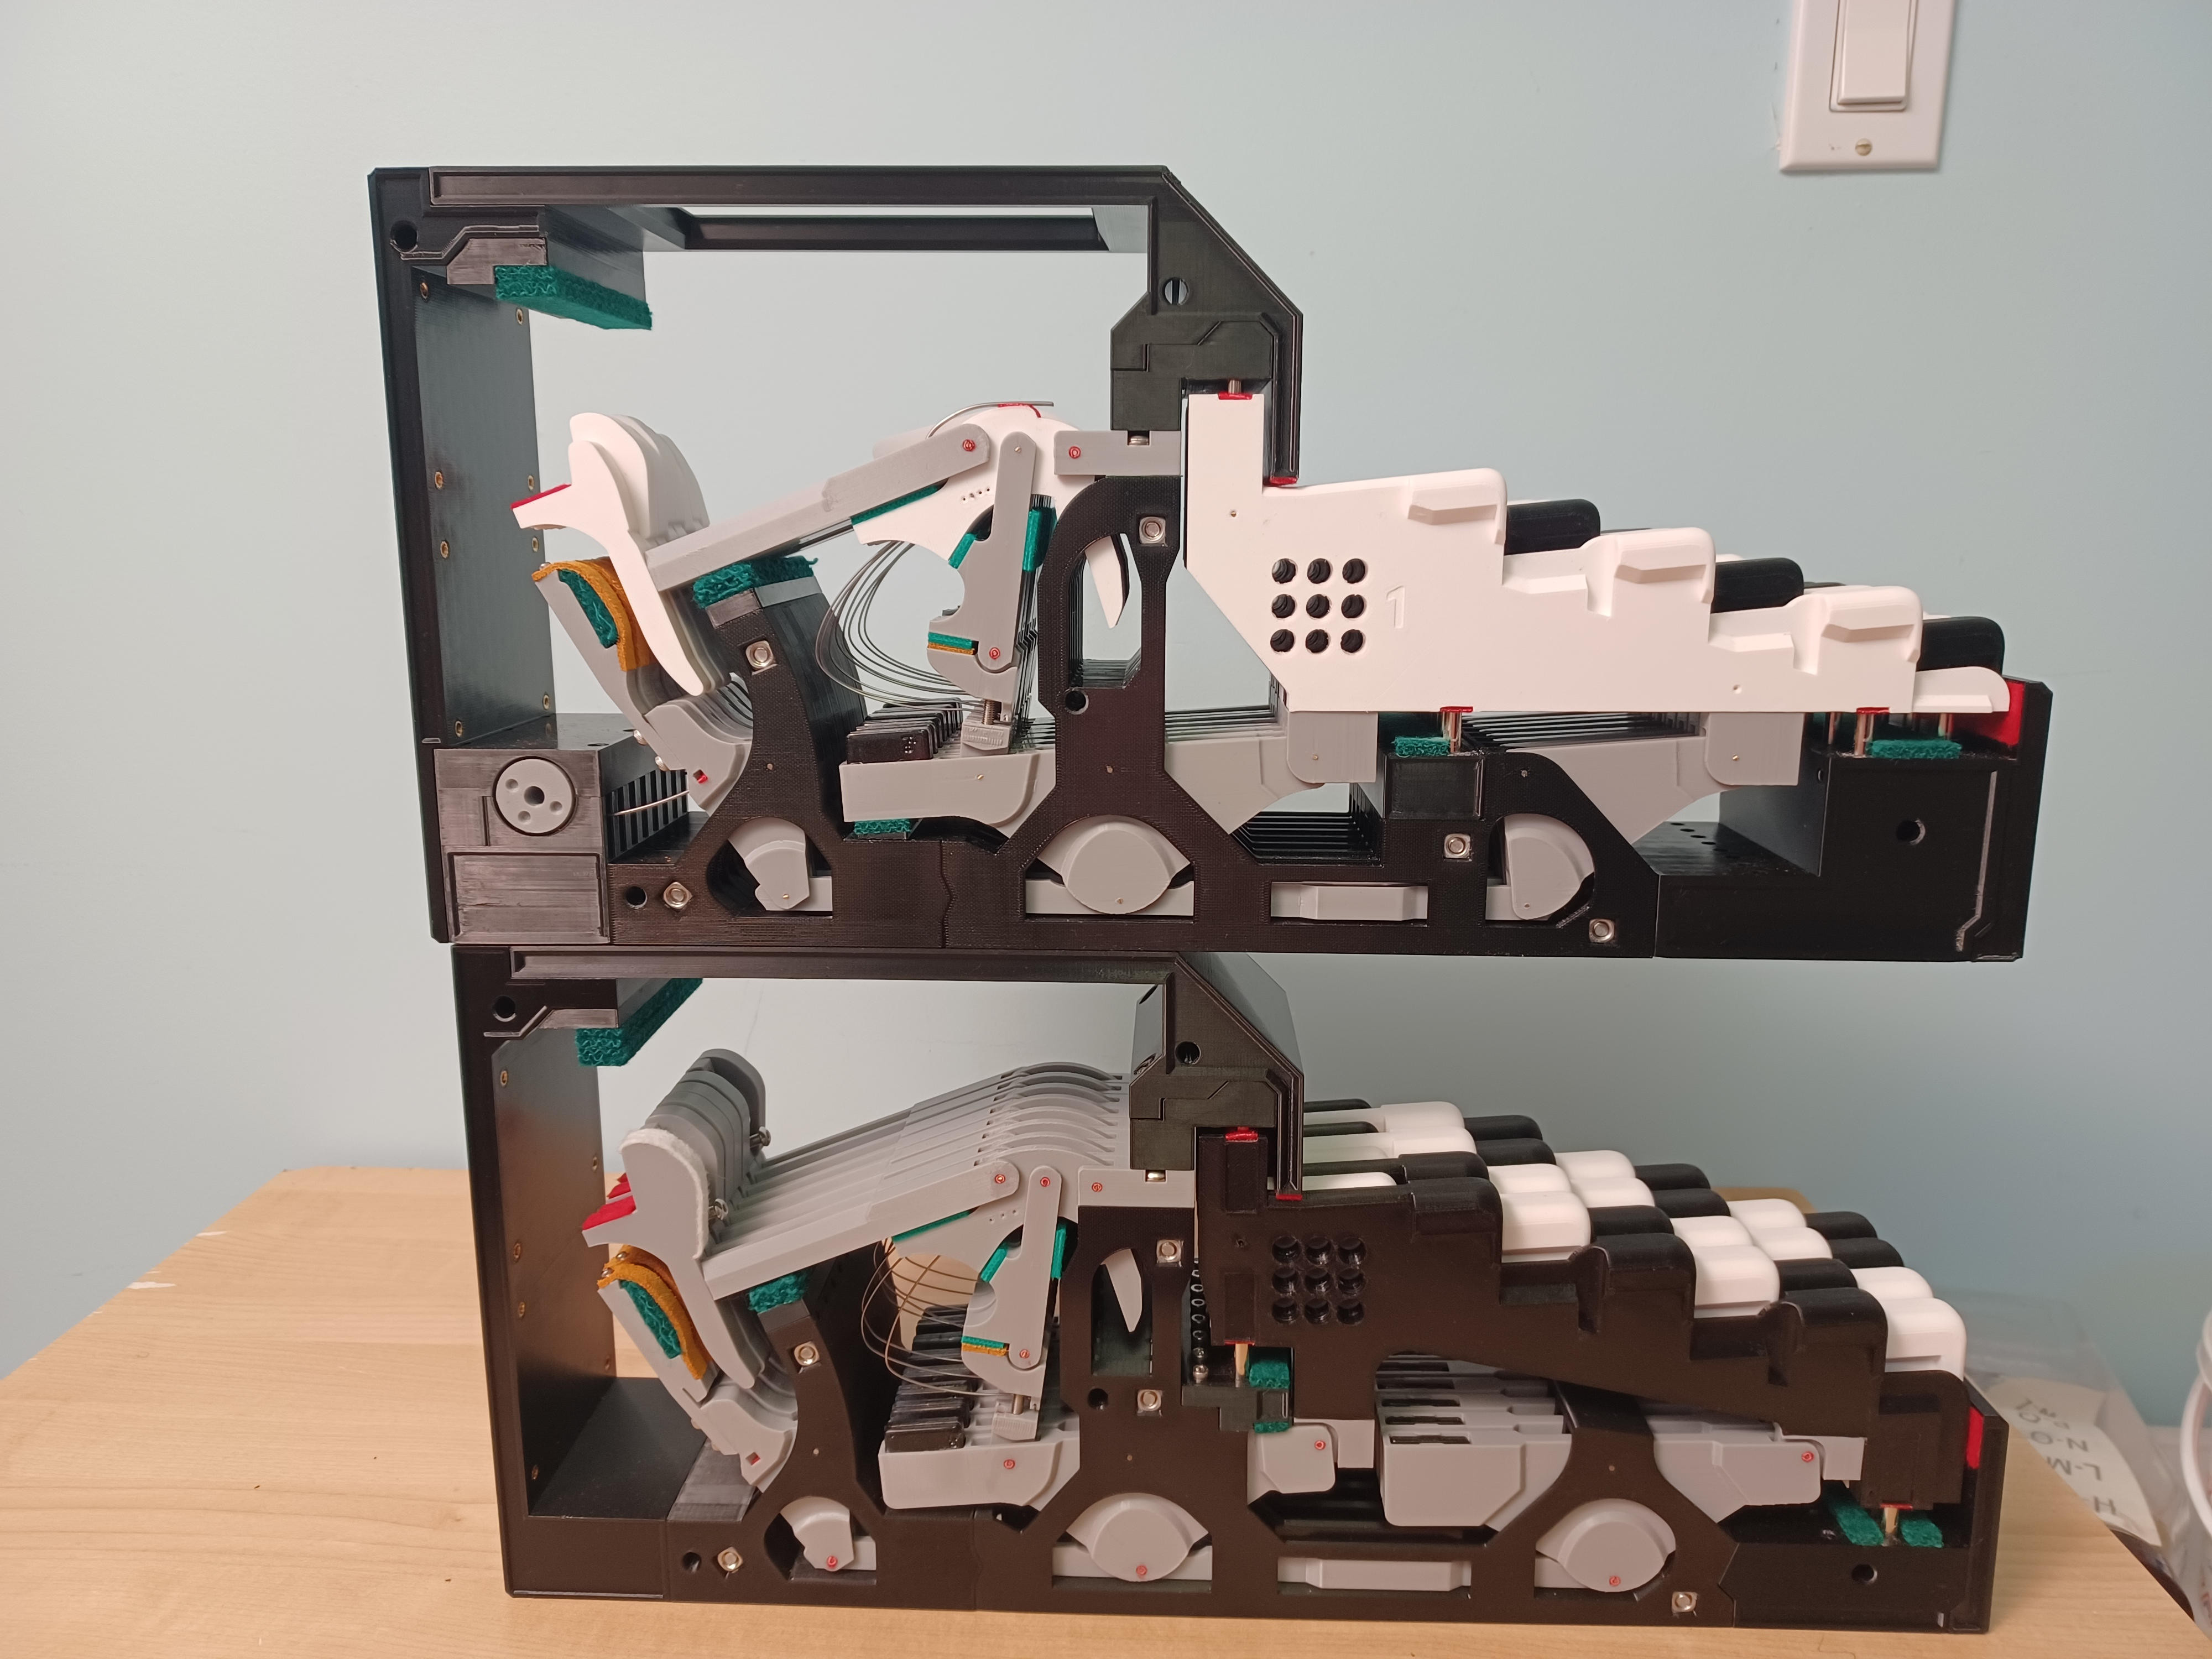
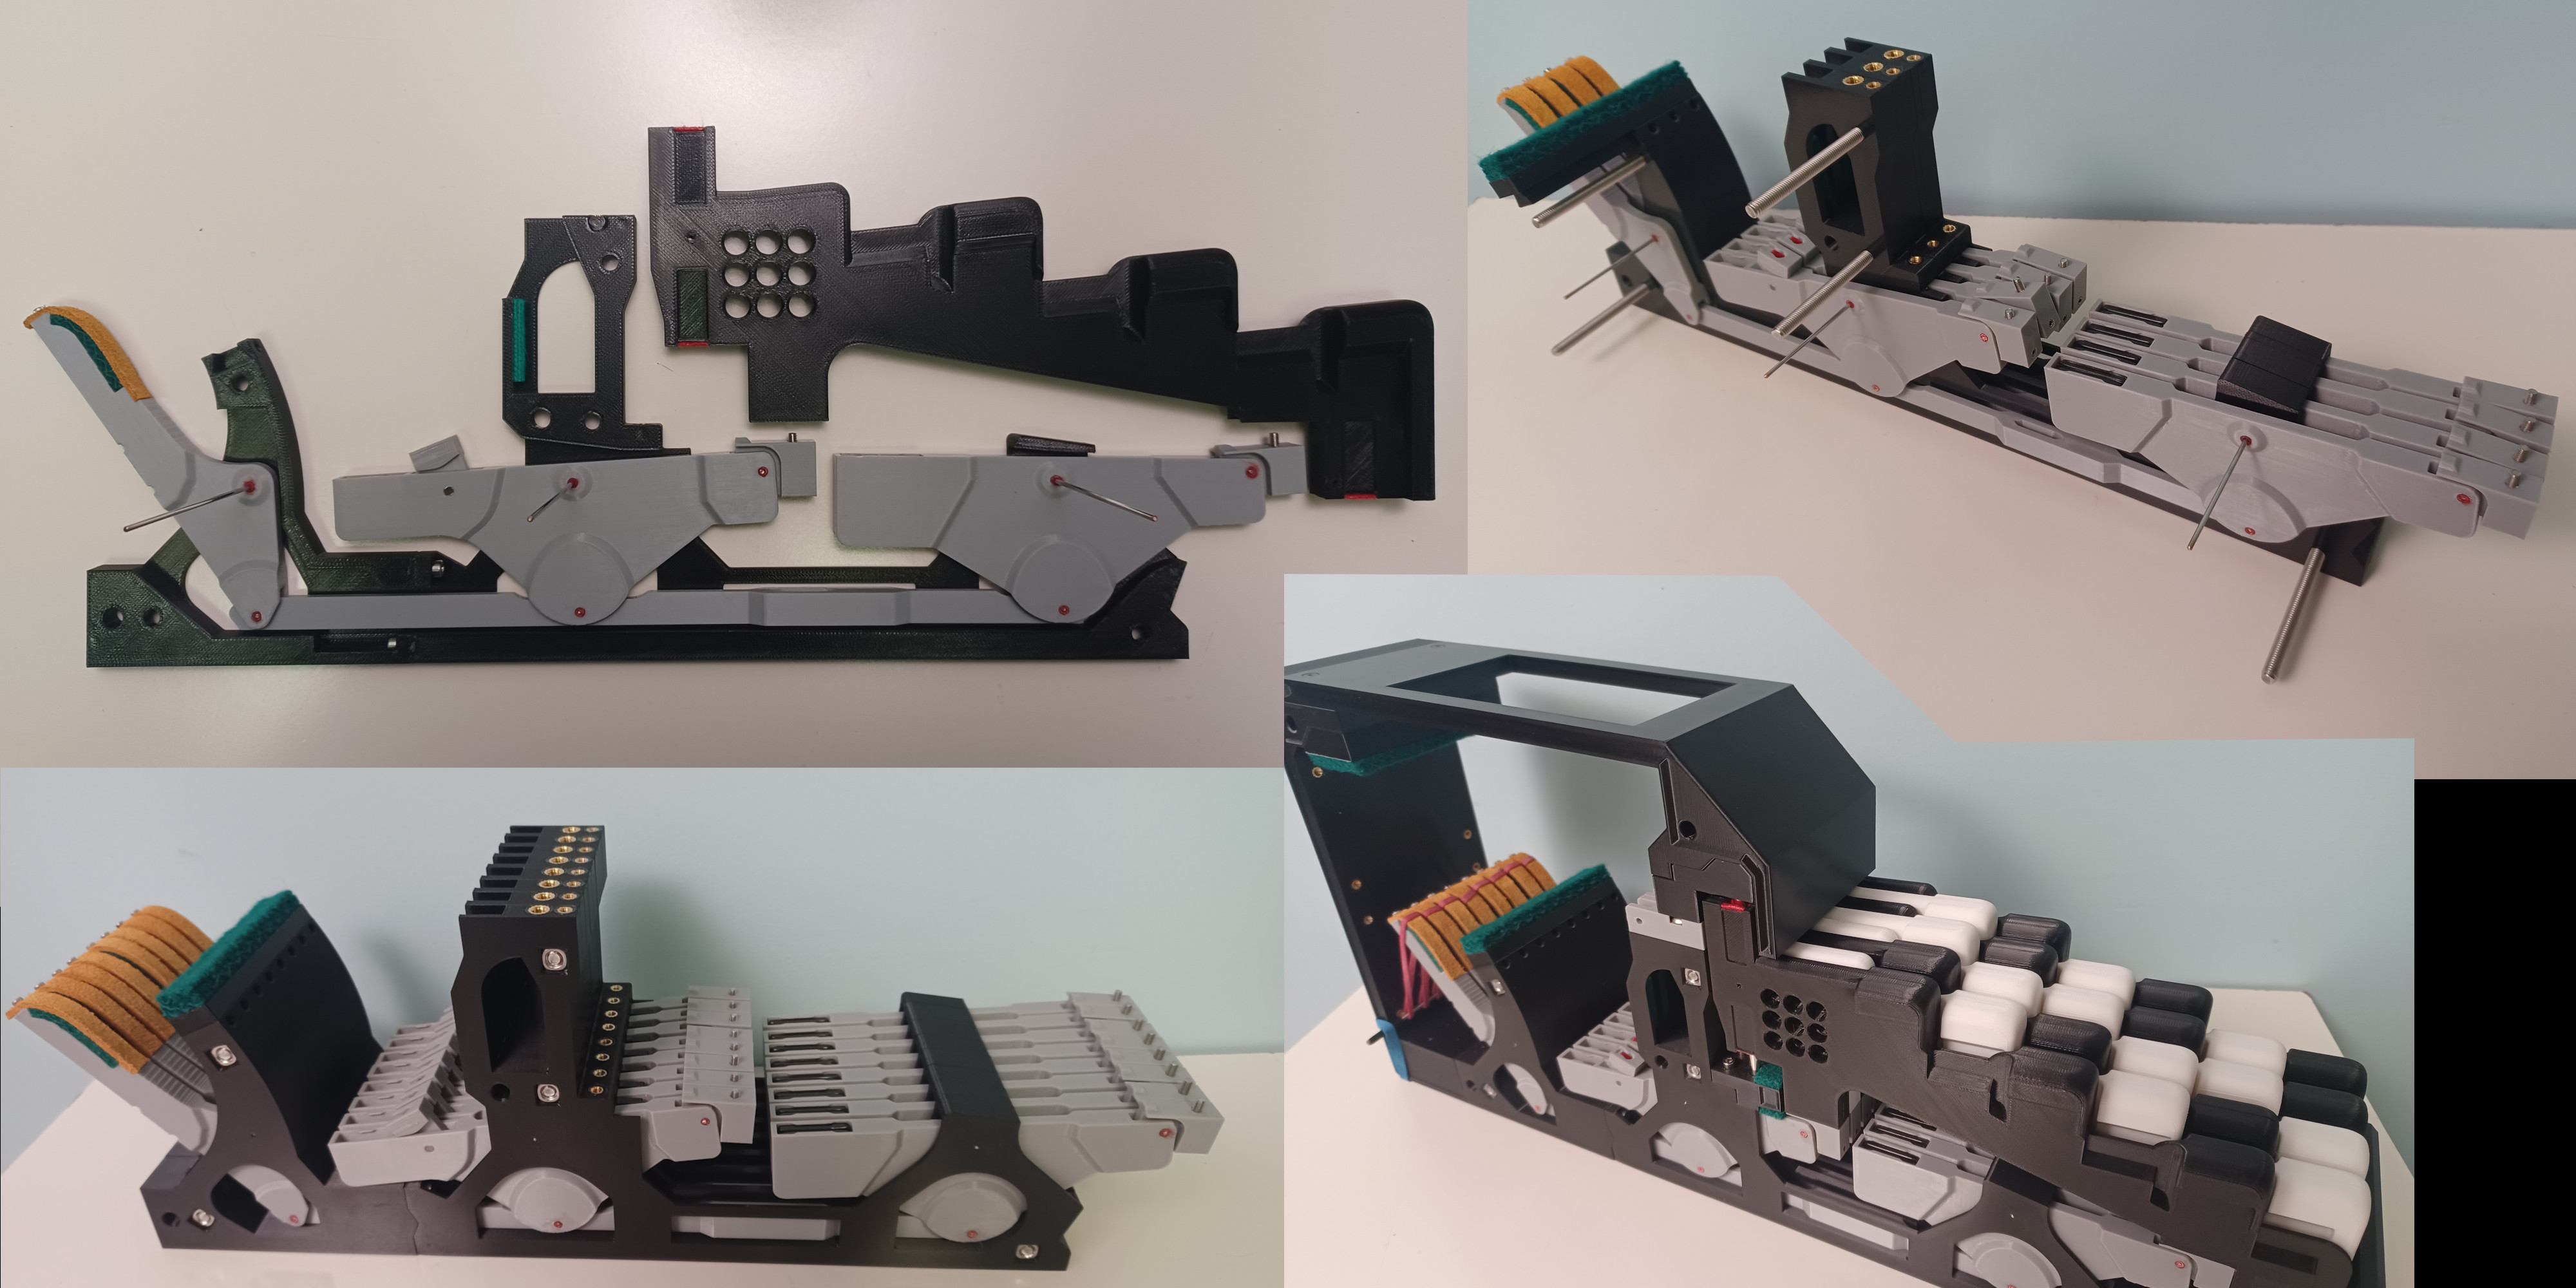
When compared to the Erard piano action, the hickman action is much simpler. For the letoff and repetition mechanism a setup similar to your own knee is used; when the key is in its rest position the two parts are aligned and force is transferred along the jack to the driving lever and to the hammer. When the letoff is triggered the two parts of the jack buckle which allows the hammer to drop down and be caught by the backcheck. Then due to the repetition spring when the key is released the hammer 'hovers' in place for a brief moment while the two parts of the jack align again, making it possible to play the next note without the key fully returning to its rest position.

I ended up getting the action capable of repeating the same note 12-14 times per second (speed wise - I can only play 3 successive notes at that speed by 'fanning' my ring, middle, and index fingers).


Two prototypes

The top prototype is a newer version which I had to redesign almost from scratch after finding glaring issues with the initial (bottom) prototype that made the repetition not work well above 8 notes/sec. I made some further changes to the top prototype after this, but they were minor at best.

One important note for the new prototype is I incorporated a weight adjustment mechanism (lower left) which is essentially a spring pushing the key up that can be adjusted on a key-by-key basis (as a replacement for weight adjustment via lead plugs), and for the entire piano via a rotational shaft to give 30 to 90 g range of key down-weight.


Sensor boards / Electronics

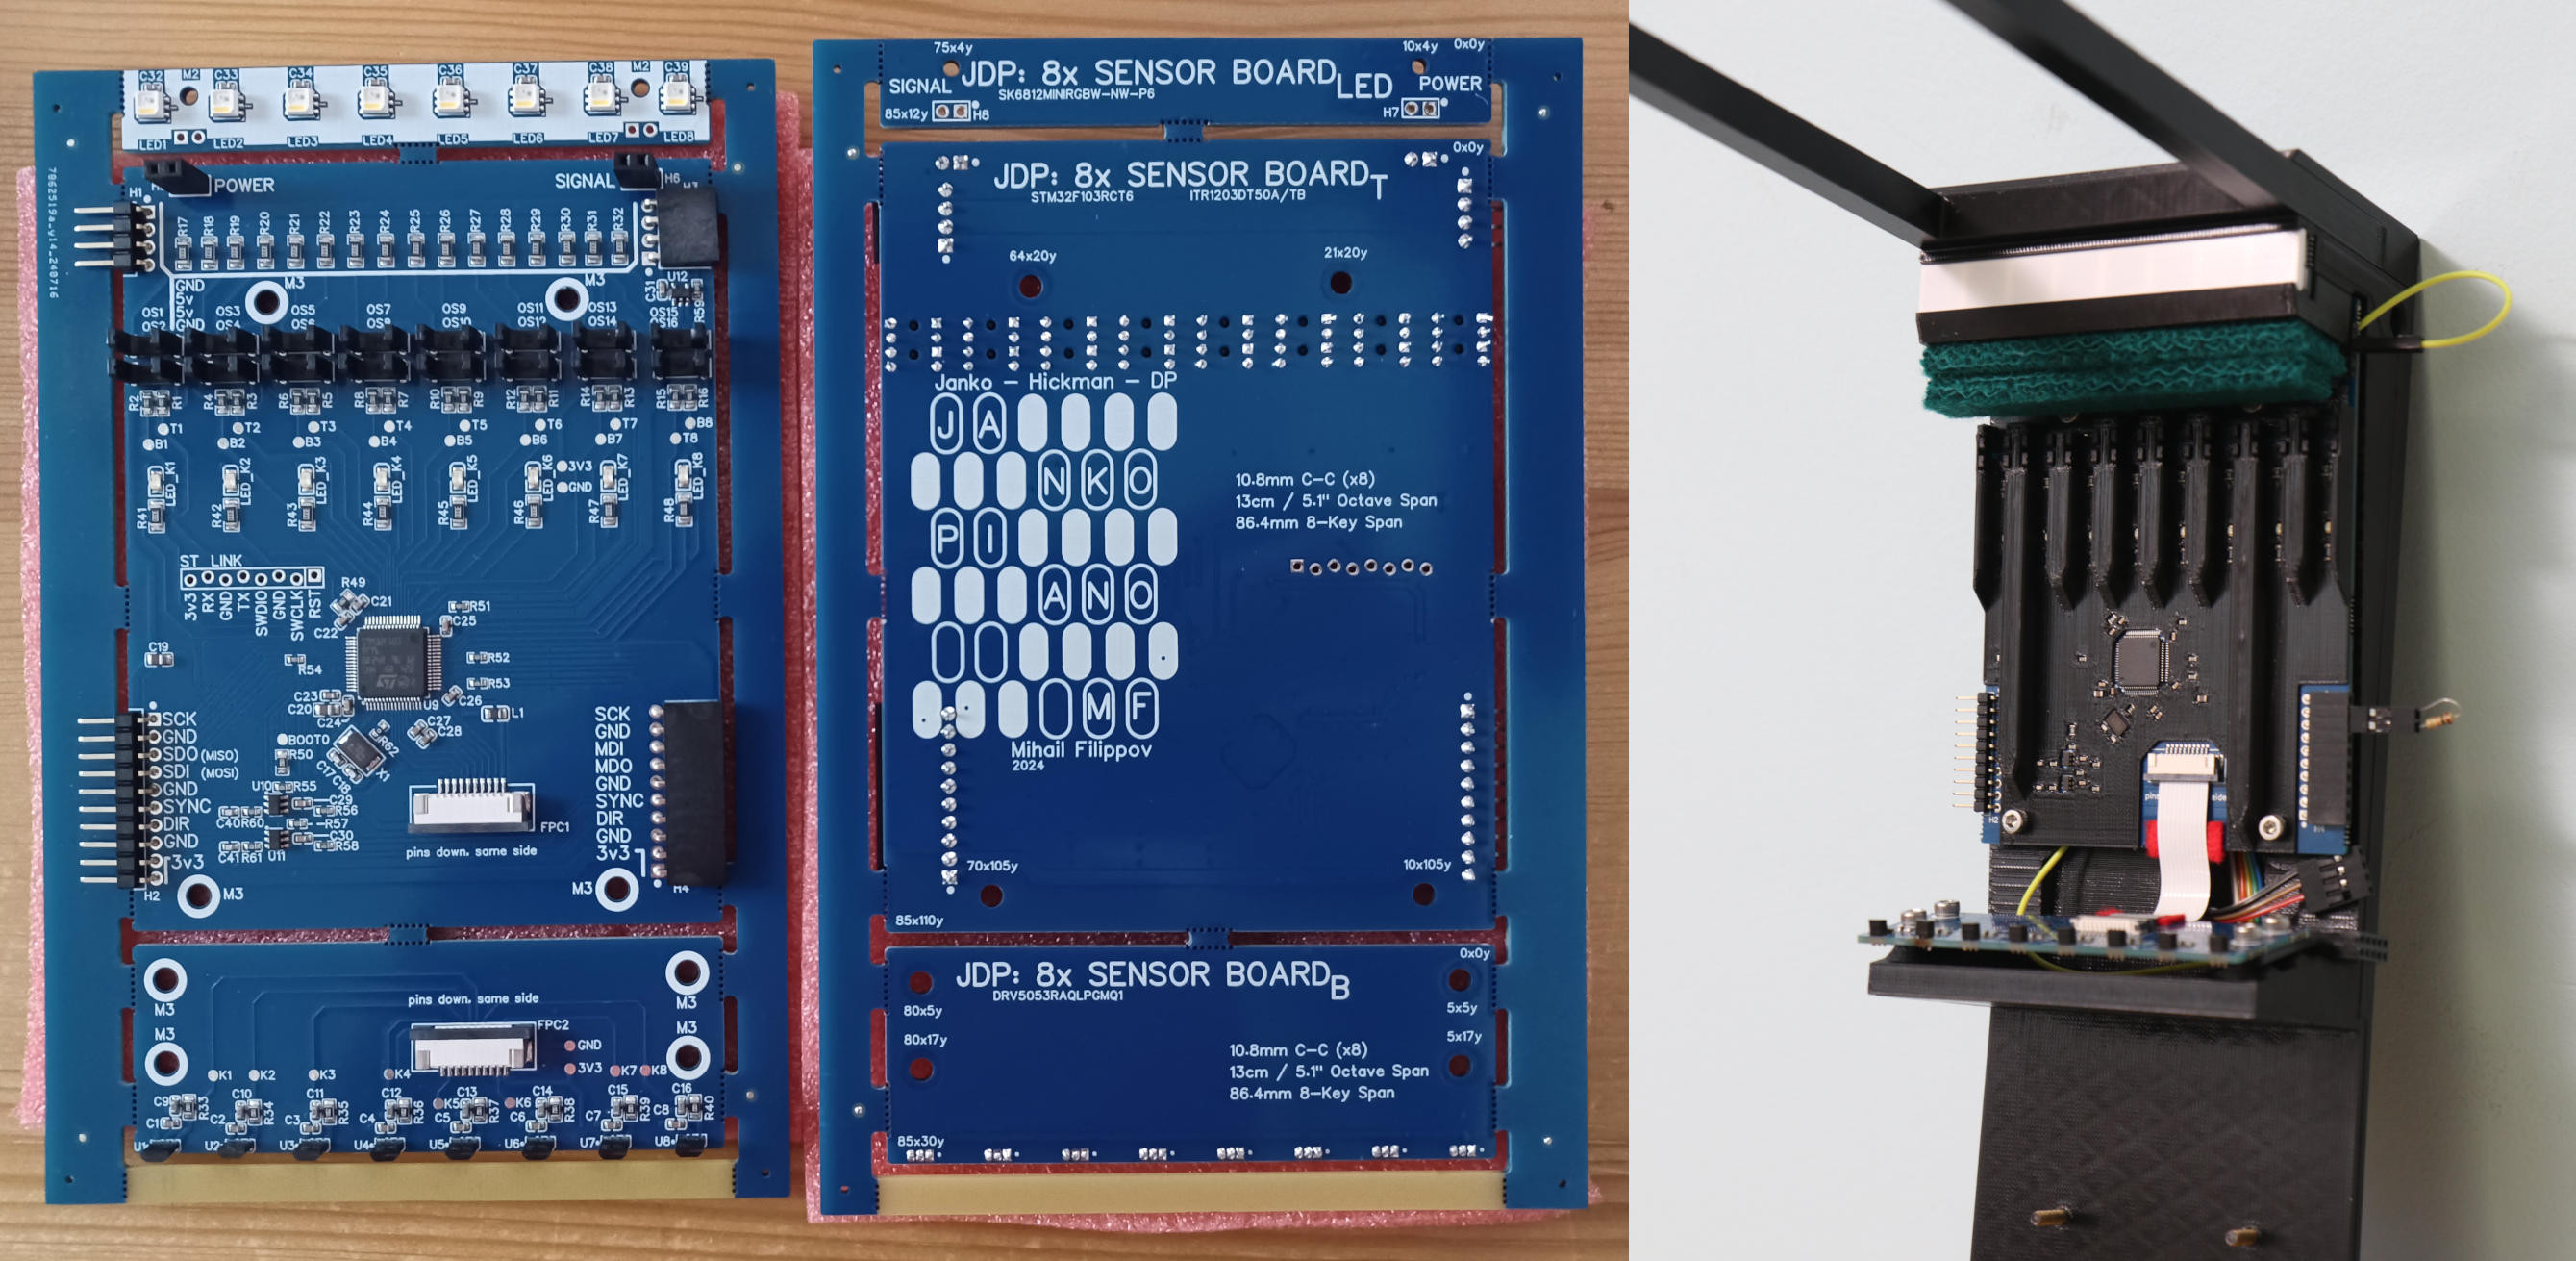
I went with easy EDA for the design of the schematic and PCB layout, mainly due to deciding right from the start that I want to order the boards made & populated without me having to learn to solder SMD components with 0.2mm pin spacing. This decision is also why I decided to go with each board having its own micro-controller, as they were quite cheap (1.20$ each) and allowed me to communicate / test each board separately via an SPI connection.

There are 16 optical slot sensors for measuring hammer velocity right at the end of its swing which should provide the best measurement for how loud the note should be played, and there are 8 hall effect sensors on the bottom (on a separate board) that are angled to read the movement of the backcheck rotor which I use to send key-off data. I originally planned to also send updates 10 times per second or so in terms of the real-time position of the keys, but apparently this information isnt used by any VST so…

Right - and at the very top (on yet another separate board) is a set of 8 LEDs similar to those found on LED strips. I figured since I am ordering the boards made anyway I might as well add in an LED strip to the piano that could light up when the notes are pressed, or alternatively act as a light metronome (though that function is far in the future).


Control unit

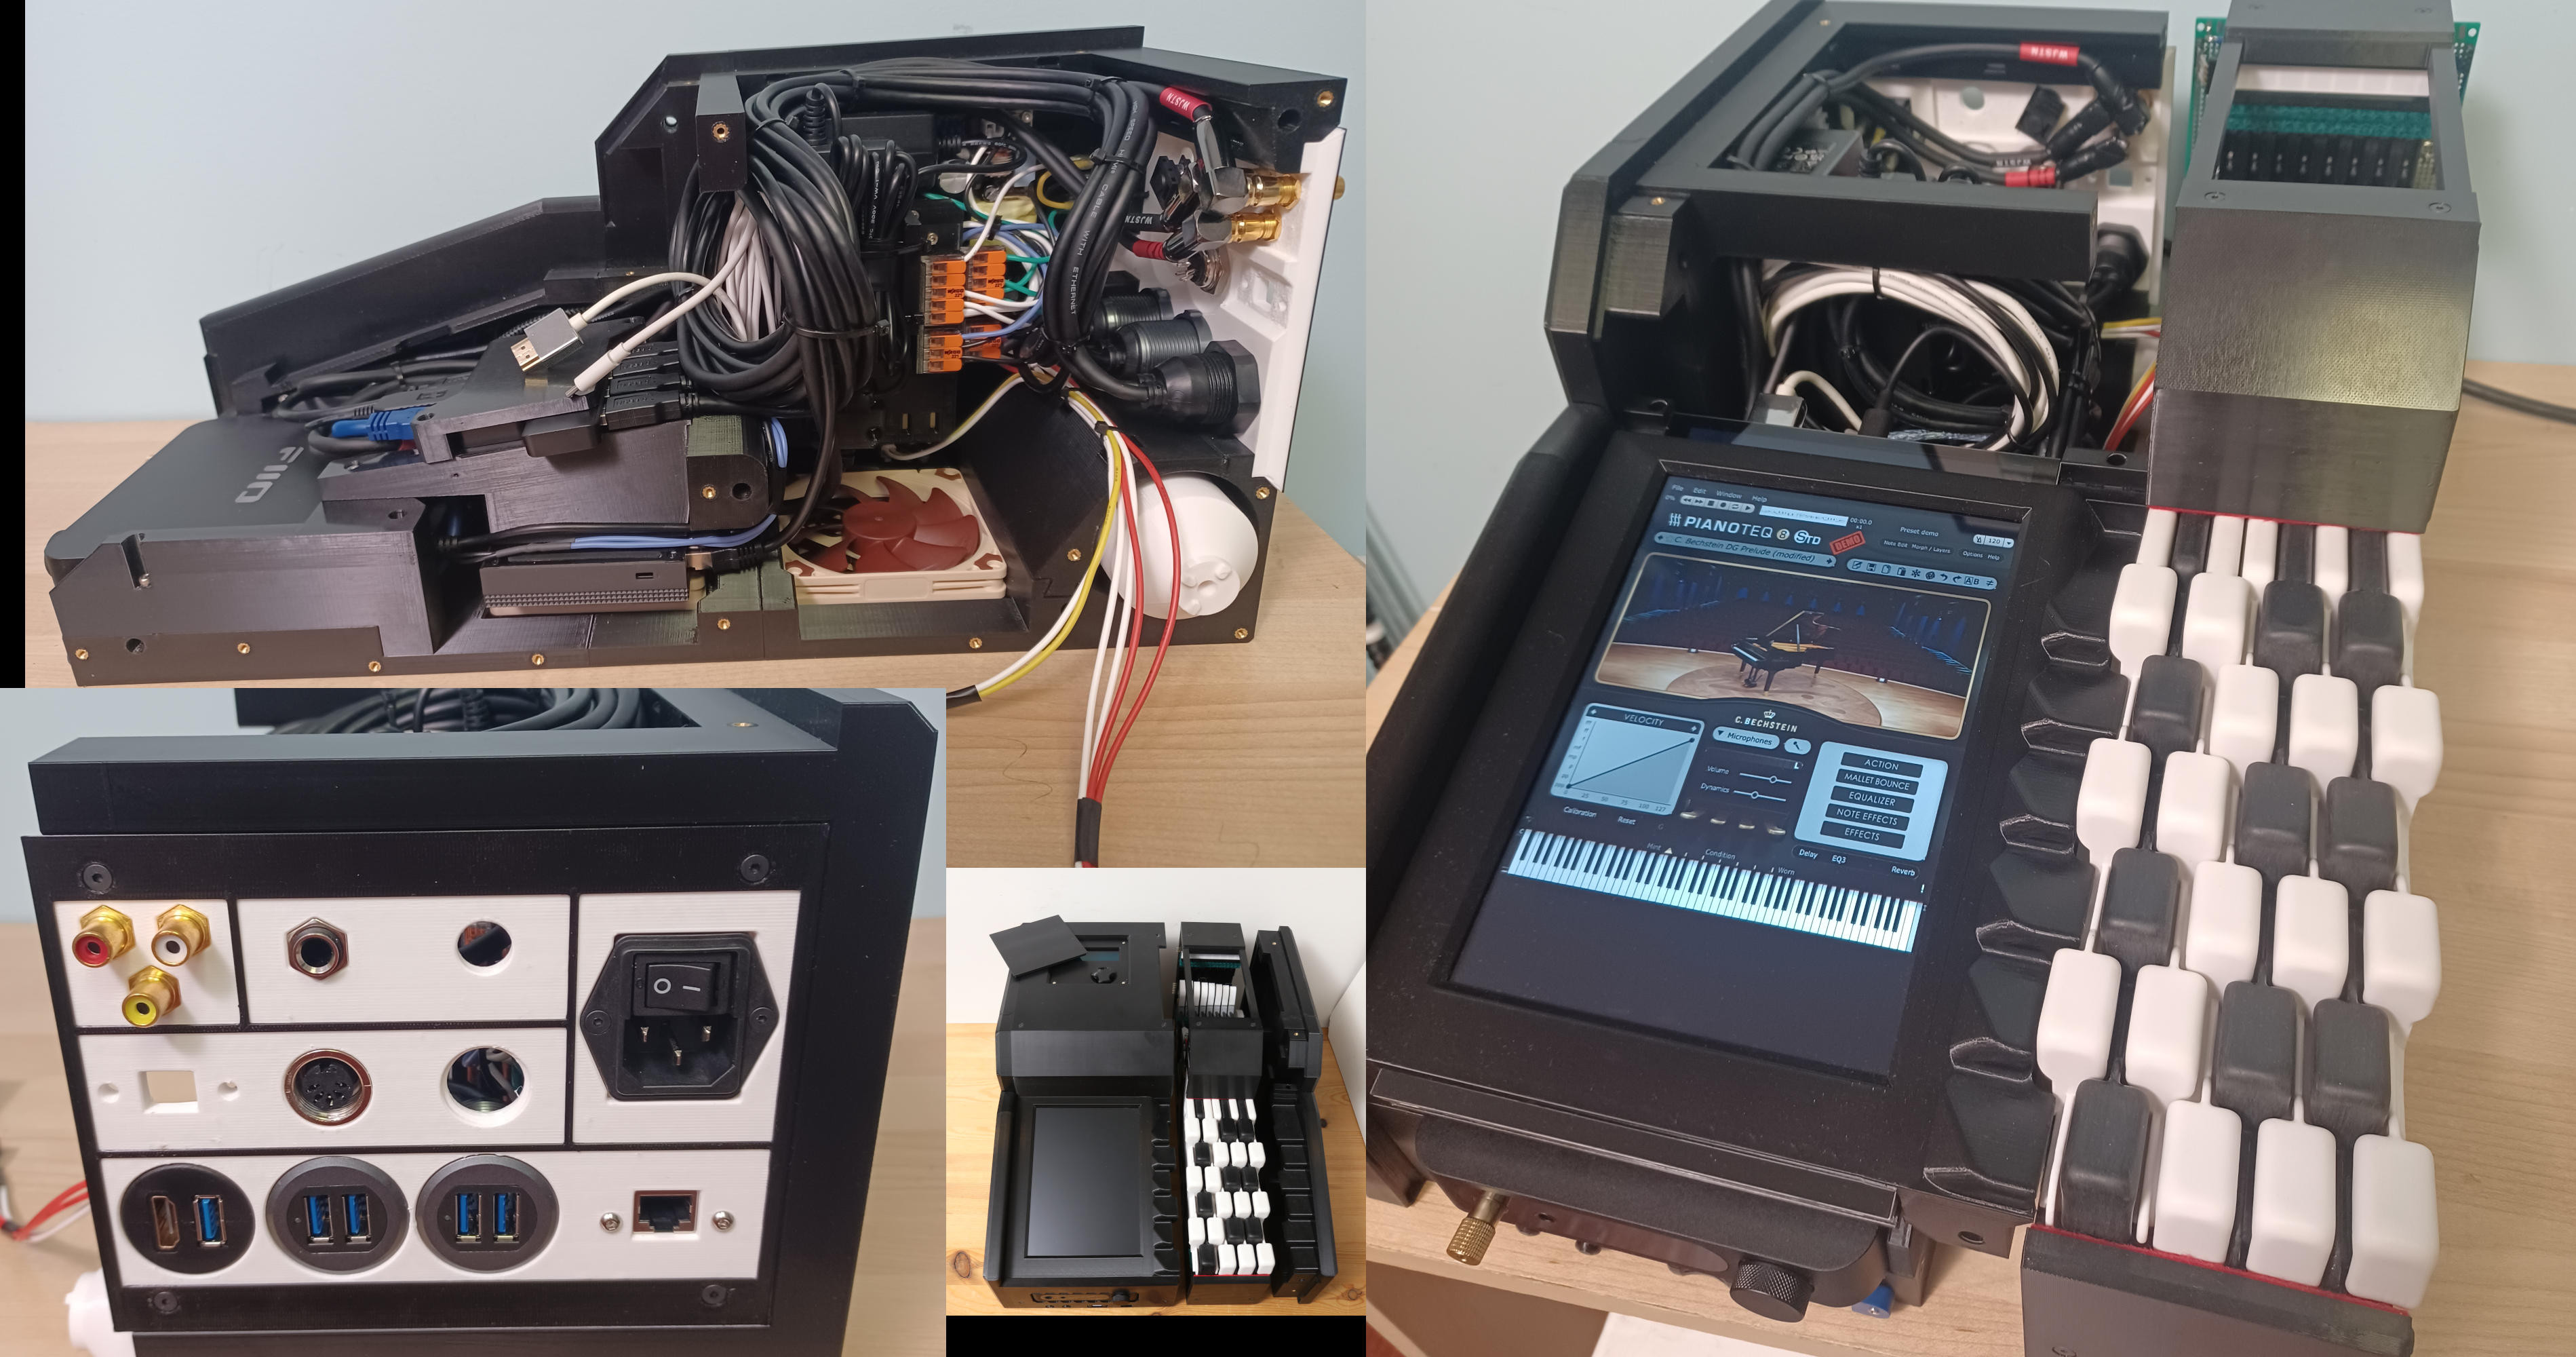
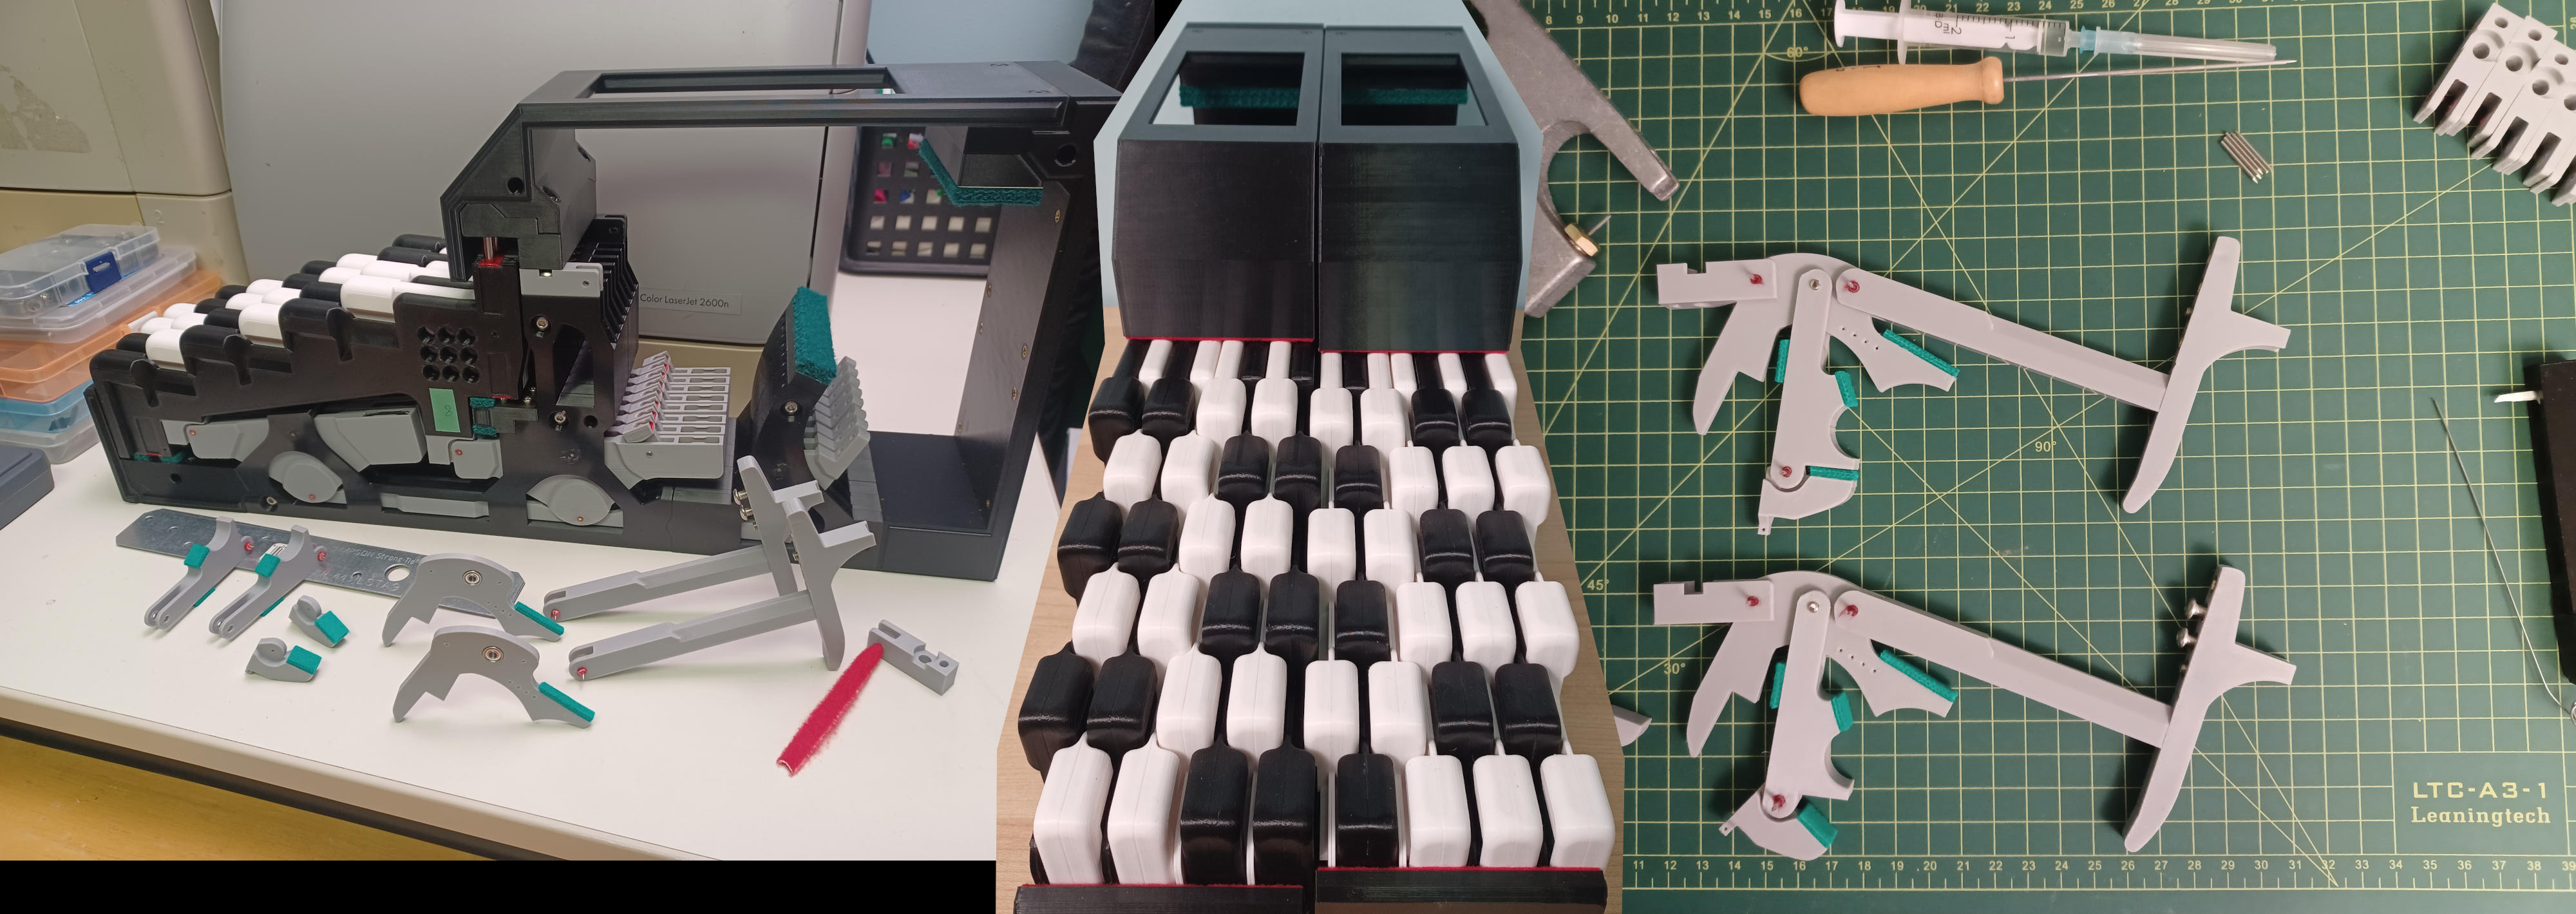
And finally I put together the control unit that will go to the left of the keyboard. I managed to fit in a mini-pc, 10 inch touch screen, DAC, and the power supplies for the 3.3v and 5v lines necessary for the sensor boards. At the moment I am outputting the MIDI data from the 8 key prototype via a MIDI cable into a MIDI to USB adapter that goes into the back of the control unit, but for the final version I will put together an integrated control unit that will go inside the piano.


DavisB

This is amazing! Absolutely love this!
Thank you for sharing this!

How are you getting such lovely finish on 3d printed parts?
How much filament does it take per key or 8keys roughly?

I'm seriously considering getting a 3d printer now!

I've always thought about putting an MCU per each of 8sensorsx11 boards, mostly in fully analog versions
since MCUs with ADCs are very cheap (that can then be oversampled if necessary for improved accuracy)

And then communicate ADC readings with main MCU (8sensors x 12bits x 20kHz would give around 1.92mbits/second per board) or 21.12 mbits in total for the main MCU to consume. (if sending hammer positions instead of hammer velocity to main MCU)

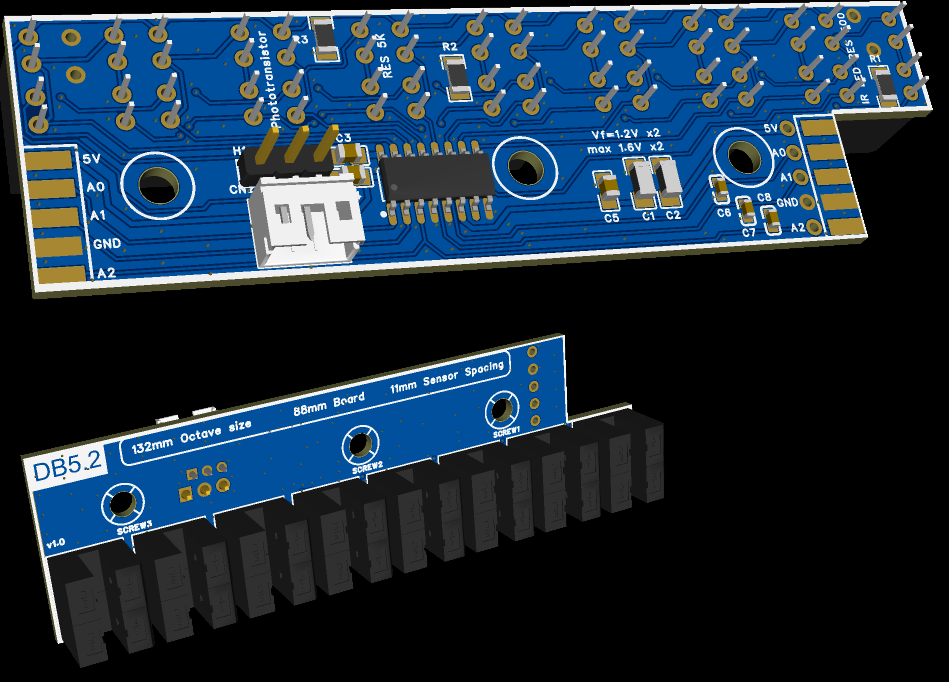
The best design I've come up for optical-slot sensors is using hc238 to alternatively lighting up one of 8 sensor pairs on the board.

(most of the caps there are do-not-place components, incl. the 2.54mm 3pin connector, and it has to be fed from 3.3V because phototransistors have 5v reverse breakdown voltage).

The PH2.0 connector has D1/GND/D2. D1 and D2 corresponding to first/second sensor of the currently active the pair Then 22 (2 per every board) of those data signals go to main MCU (rp2040) that has schmitt triggers on GPIO pins. And 3 pins used to drive the address. This leaves only few pins left on rp2040, but seems like is fully sufficient for a midi keyboard.


Mike Filip

3d part finishing:

I print with PETG in an enclosed prusa mk3 printer - comes out pretty decent, though I think the picture quality is making it look a bit better than they are IRL. I tried to make most of the visible surfaces be the 'first layer', which makes the texture dependent on the bed used (satin bed comes out nice, but I ended up with lightly sanded garolite/g10 giving a good texture).

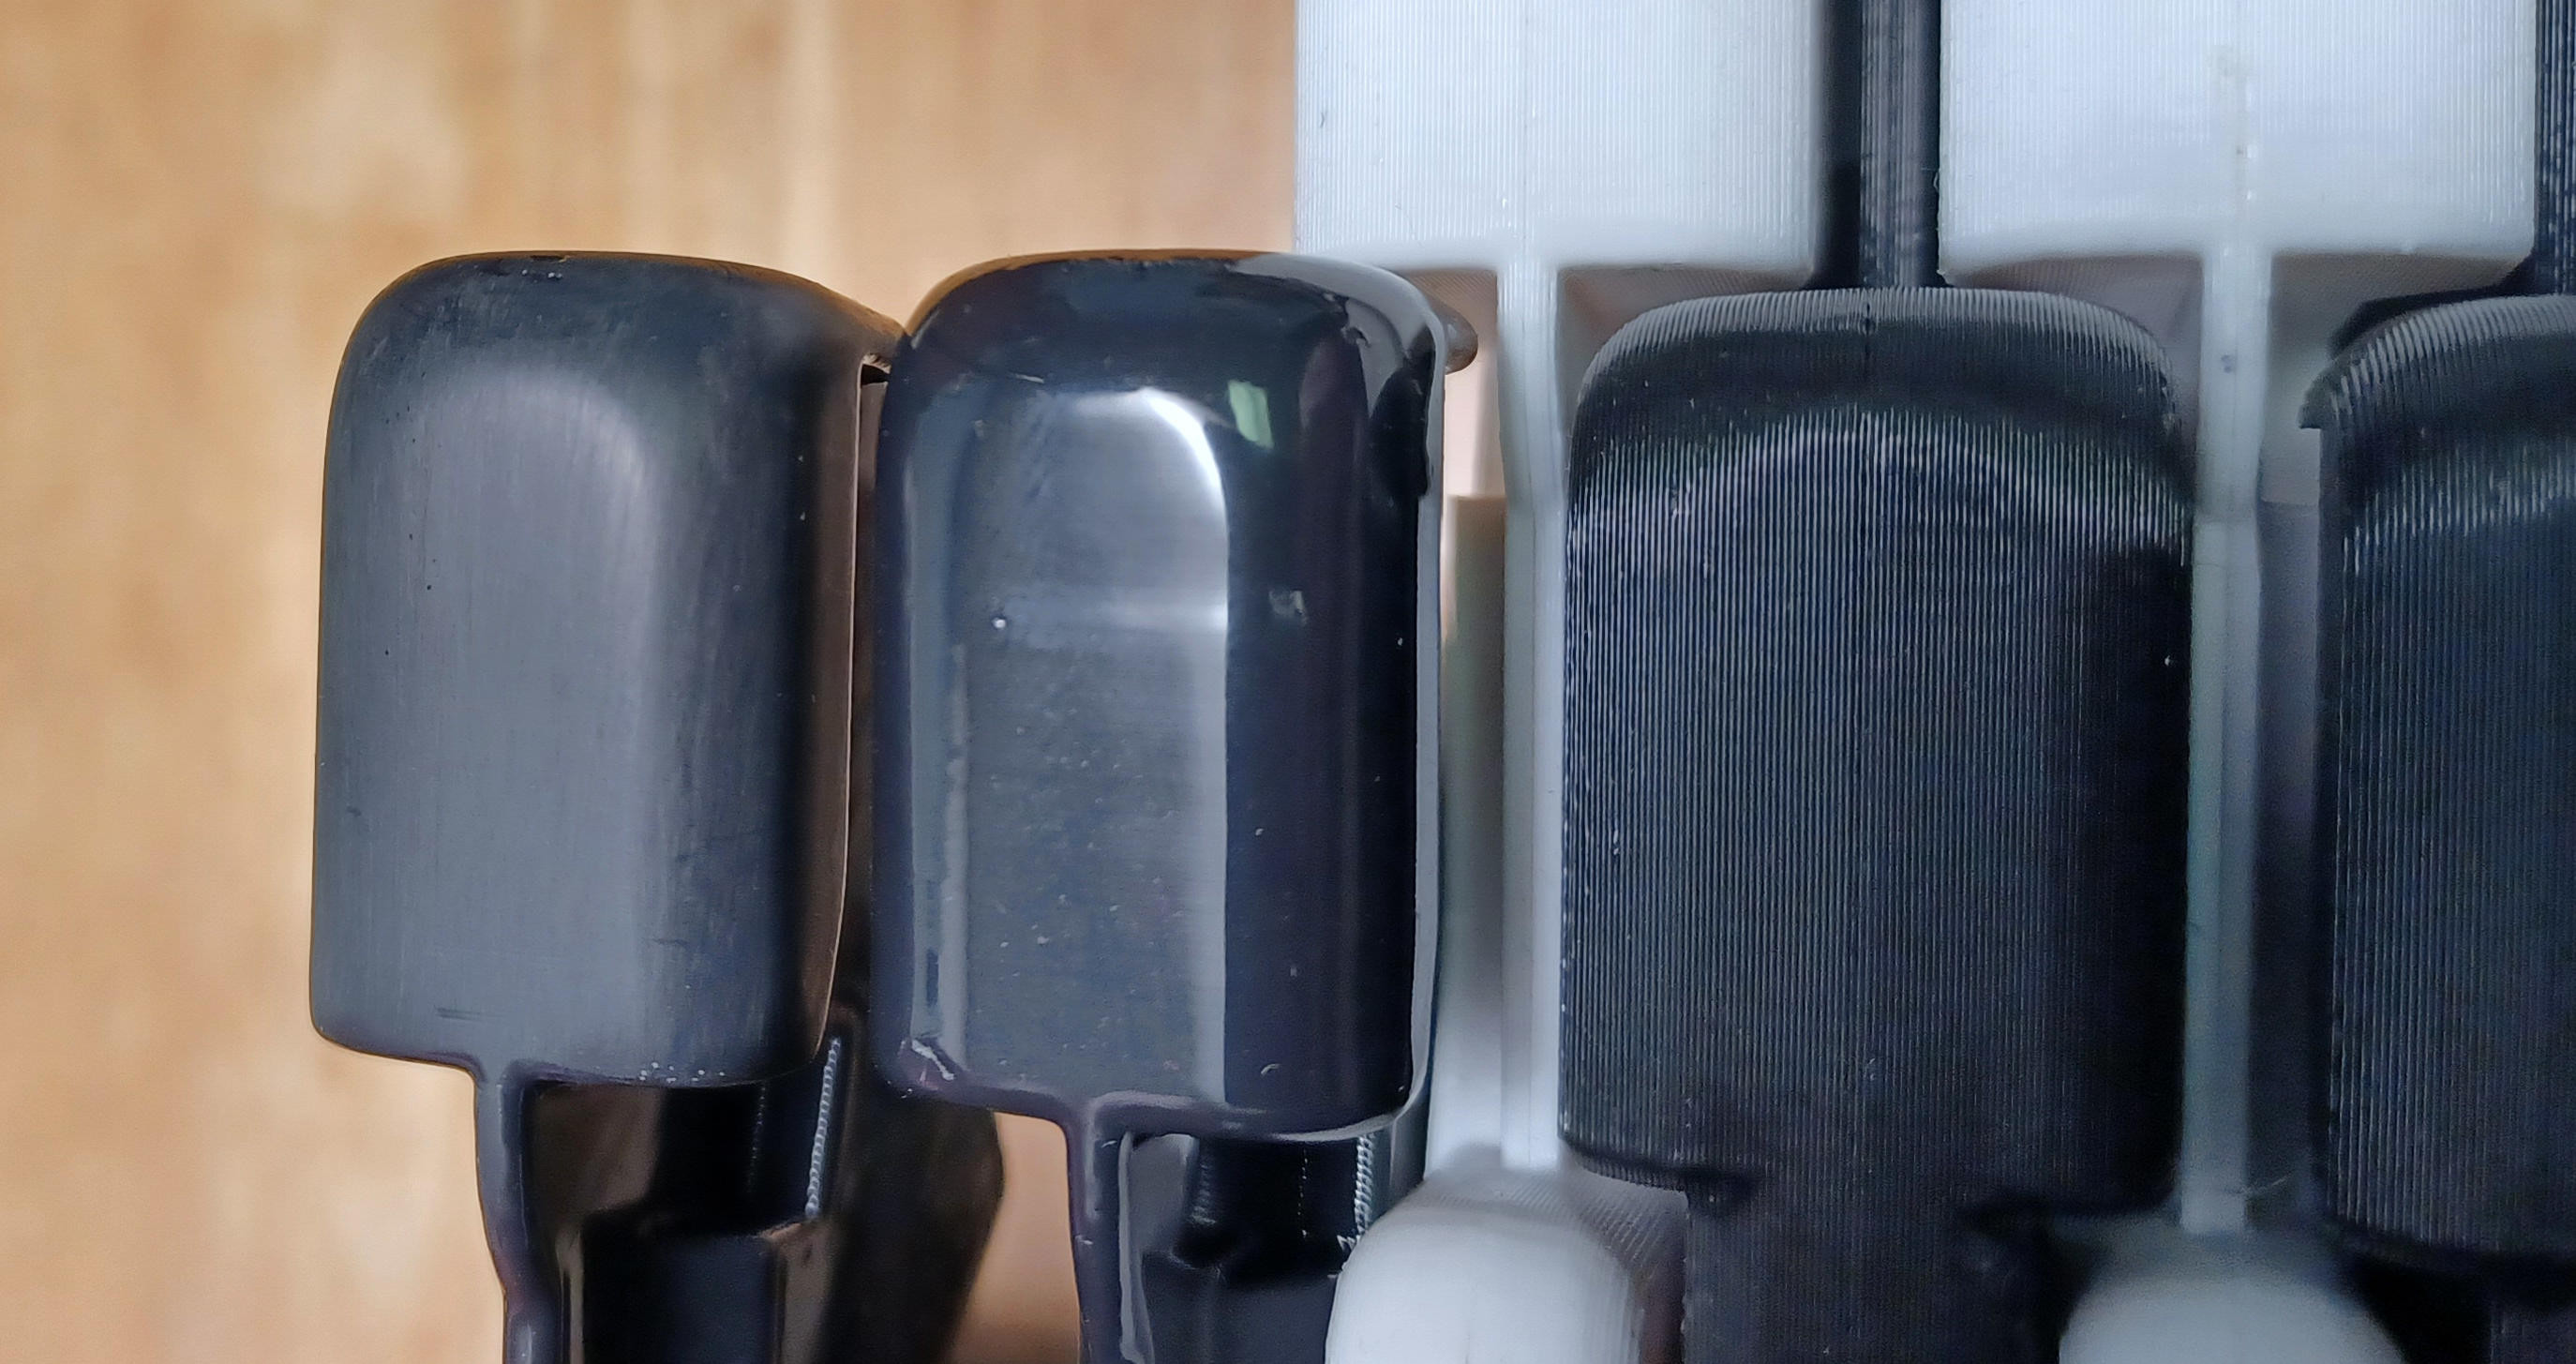
The keys themselves I printed in ASA followed by vapor smoothing and then sanding it to get a good texture for the keys (most important part I think). Here is a picture of the process (right is straight off printer, middle is vapor smoothed, left is sanded).

As for the action parts I printed them in PETG as well and any holes were made slightly under-sized so as to drill them out to spec. Only way to get the consistency necessary for piano action centers.

filament usage:

The entire piano will have 25 kg worth of filament. Thats 5 kg for the side covers and 20 kg for the keybed, though keep in mind that the 20kg includes both the frame, action, and keys. Each key is around 45g, with the action parts being... maybe 80g?

3d printer:

yes, its no longer a 'maker' market now, so getting a decent 3d printer that you dont have to worry about 'fixing up' is quite possible even in the 500$ range. Better yet it should still be possible to buy a MK3 prusa printer second hand for like 250$ or so - a steal if you ask me.

Micro-controller:

exactly. I thought about multiplexing, but doing that for analog signals is a bit of a complication I dont want to get into, plus as I said - the price of microprocessors is exceptionally low now - I paid 15$ for the 11 STM32 controllers for the 11 boards, and like 90$ for the optical + magnetic sensors.

In addition it allows for much more precise sensing (though how important that is once you get into the sub-10us range is debatable) as each sensor can have its own dedicated timer input / ADC pin, and makes programming easier as you dont have to write the multiplexing code.

HC238 multiplexing:

Are you essentially 'blinking' the LEDs on the sensors and have the photo-transistors grouped together? Doesnt that have issues with LED rise times and similar? When I was planning out something similar I was looking at essentially multiplexing the photo-transistor outputs while leaving the LEDs constantly on - is there a reason to blink the LEDs instead?

Abou your board; so you have 2 data lines (D1/D2) and switch between the 8 sensors via A0/A1/A2. So a series of boards are wired to share the same 5v/A0/A1/A2/gnd bus while the D1/D2/gnd connector is dedicated per-board and connects to the main controller?


vagfilm

Wonderful original and thorough project… That Hickman action is a great find. The more engineering clacker minds are certainly already thinking about using it in non-janko DIY keyboards 😜. Congratulations.

May I ask how silent is the action compared to a common digital piano keyboard? About the same?


DavisB

Mike Filip

About your board; so you have 2 data lines (D1/D2) and switch between the 8 sensors via A0/A1/A2. So a series of boards are wired to share the same 5v/A0/A1/A2/gnd bus while the D1/D2/gnd connector is dedicated per-board and connects to the main controller?

That's correct.

Infrared LEDs can switch very quickly. Phototransitors on the other hand take about 500ns-1.5us to transition as the led is turned on and off (from my measurements). This depends on the load on the phototransistor output - it's pulled to ground usually via 5k-10k resistor - and the brightness of the LED. This is controlled by resistors (one for IR leds and two for each of photoresistors in pair (D1/D2 output)).

Phototransitors have capacitance (I think it's called Miller effect or Miller capacitance) and as you switch from one to another you have to charge and discharge it. Having a smaller value resistor will discharge it faster, and having a brighter led will charge it faster.

I'm aiming at 20khz sampling rate for every sensor. That gives 50us total sampling window for all sensors. And 6.25us to switch in a group of 8 sensors (1us-2us taken up for transition, with 4-5us left to read the value) .

Yes, power to the whole IRled/phototransistor pair is switched on and off, so only 1 out of 8 pairs is active at a time.
The main benefit is reducing powerconsumption (and requires way less resistors to be soldered - which only matters if handplaced) - and makes it possible to power the whole device just from USB.

It does require more effort on the programming front regarding timing. (I'm slightly obsessed with making a very affordable and simple design for a narrow key piano, and I'm willing to go through the extra effort for that).

I love janko keyboards, they are way more playable for people with small hands than traditional pianos! And I really like the idea behind isomorphic layouts and it's unfortunate that they haven't found widespread adoption despite having a better design and ergonomics!


Mike Filip

vagfilm May I ask how silent is the action compared to a common digital piano keyboard? About the same?

Around the same, yes. The loudest sound is made when the hammer strikes the hammer-hit-felt, which I dampened by doubling the felt. Overall when I place the prototype next to my korg sp250 and try them out they sound quite similar.

DavisB (I'm slightly obsessed with making a very affordable and simple design for a narrow key piano, and I'm willing to go through the extra effort for that).

Seems like we went in completely opposite directions in terms of design priorities. You are going towards affordability while I am aiming towards a 'no expenses spared'.


vagfilm

Mike Filip

I must say that the more I look into your prototype the more intrigued and more impressed I become. The level of attention to detail is at a whole different level from regular DIY.

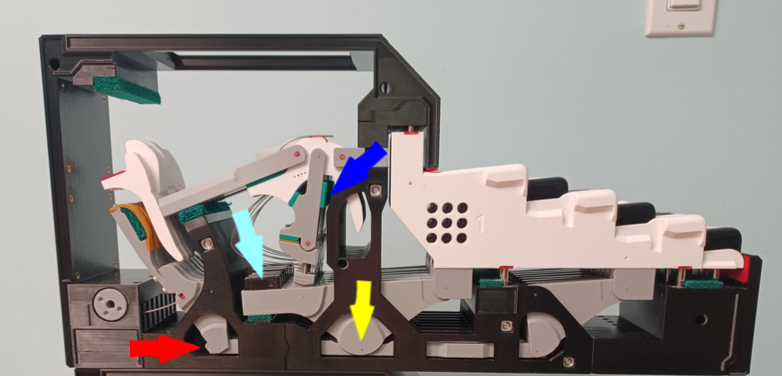
The hickman action sure looks like a promising simplified action. May I ask you a couple of questions about it, since I have some doubts when looking at your photos, because there is no scale in the images ? (in fact there is a ruler in one photo, but that is a lot of interpolation…)

  1. If these were regular long keys (ie, not Janko, sorry…) the actual pivot point would be at the yellow arrow, correct? If so, the capstan looks to be only a few cms behind it. What is the actual distance from the pivot to the capstan? And what is the vertical displacement of the capstan? I assume the vertical displacement is increased because of the cantilever system, and in a regular key the capstan would need to move backwards, correct?
  2. How is the backcheck raised? The cantilever bottom bar (red arrow) moves backwards?
  3. In the Hickman diagrams there a regulation screw that pushes at the green felt (blue arrow). In your design, that screw was removed and the white piece ((jack???) pushes the gray piece (wippen???). You found that there was no need for regulation? Different tension in the metal springs do not affect that movement?
  4. The black things close to capstan are weights (light blue arrow) ?
  5. In this photo it looks like the hammers have different shapes. Is this simply tests of different designs?
  6. What is the actual depth of your prototype. My estimate is about 60 cms. Is it longer than that?

Again, congratulations. This design raises a lot of ideas…


Mike Filip

Well, the entire hickman action is a rabbit hole in and of itself, even without the extensive modifications I needed to make in order to replace the regular piano keys with the rotor based janko variants (which are of my own design - the original janko version relied on parallelogram style keys that actually pushed down on regular 'key-levers'… yet another rabbit hole).

The best place to start looking into the hickman action would likely be at mechanical music digest. It has a (rather badly) ms-paint drawn animation that at the very least gets the point across, but also provides an explanation of how the action works and links the patents (with drawings) for the action.

This video, and others from that author, offer the look from the perspective of someone rebuilding the action - he apparently got it in working order in the past couple weeks, so grats to him!

This video is the only video I found of the action in action. I tried to tune my action accordingly, but I had to make changes when I realized that the video's action is a bit badly tuned - the back check is set a bit too low. Still, it gets the point across.

There are also these two posts talking about the action, but keep in mind that all of their discussion is purely theoretical, such as the very heated debate on whether or not such an action would even work in real life (completely ignoring that pianos with such an action were made… though there is VERY few of them - probably single digits)

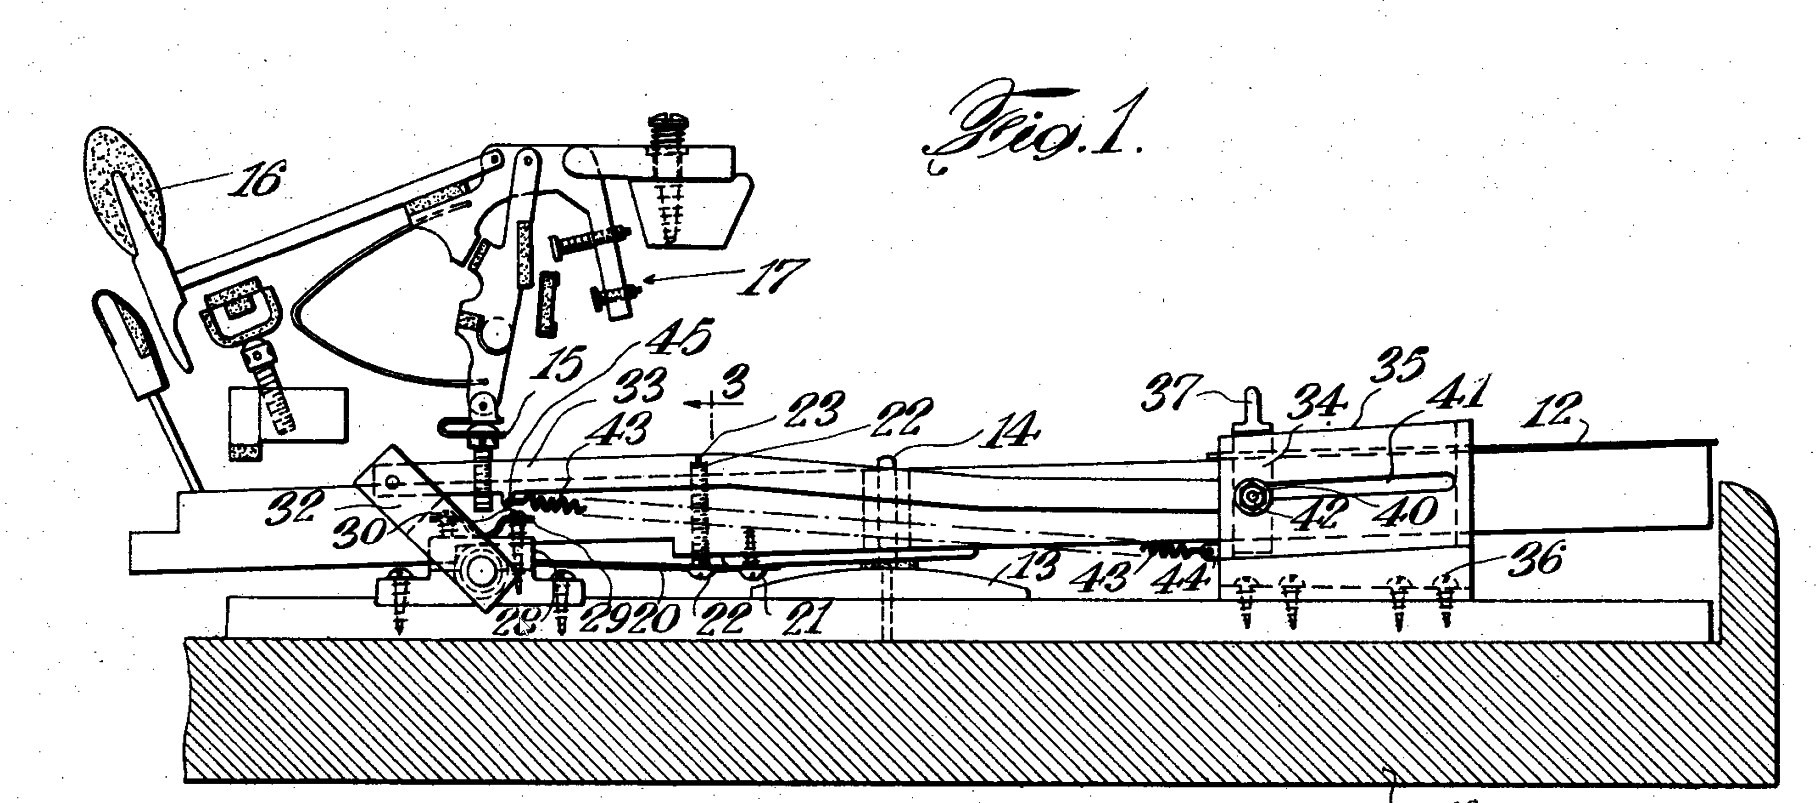
Here is a picture from the patent papers showing the action with the full key:

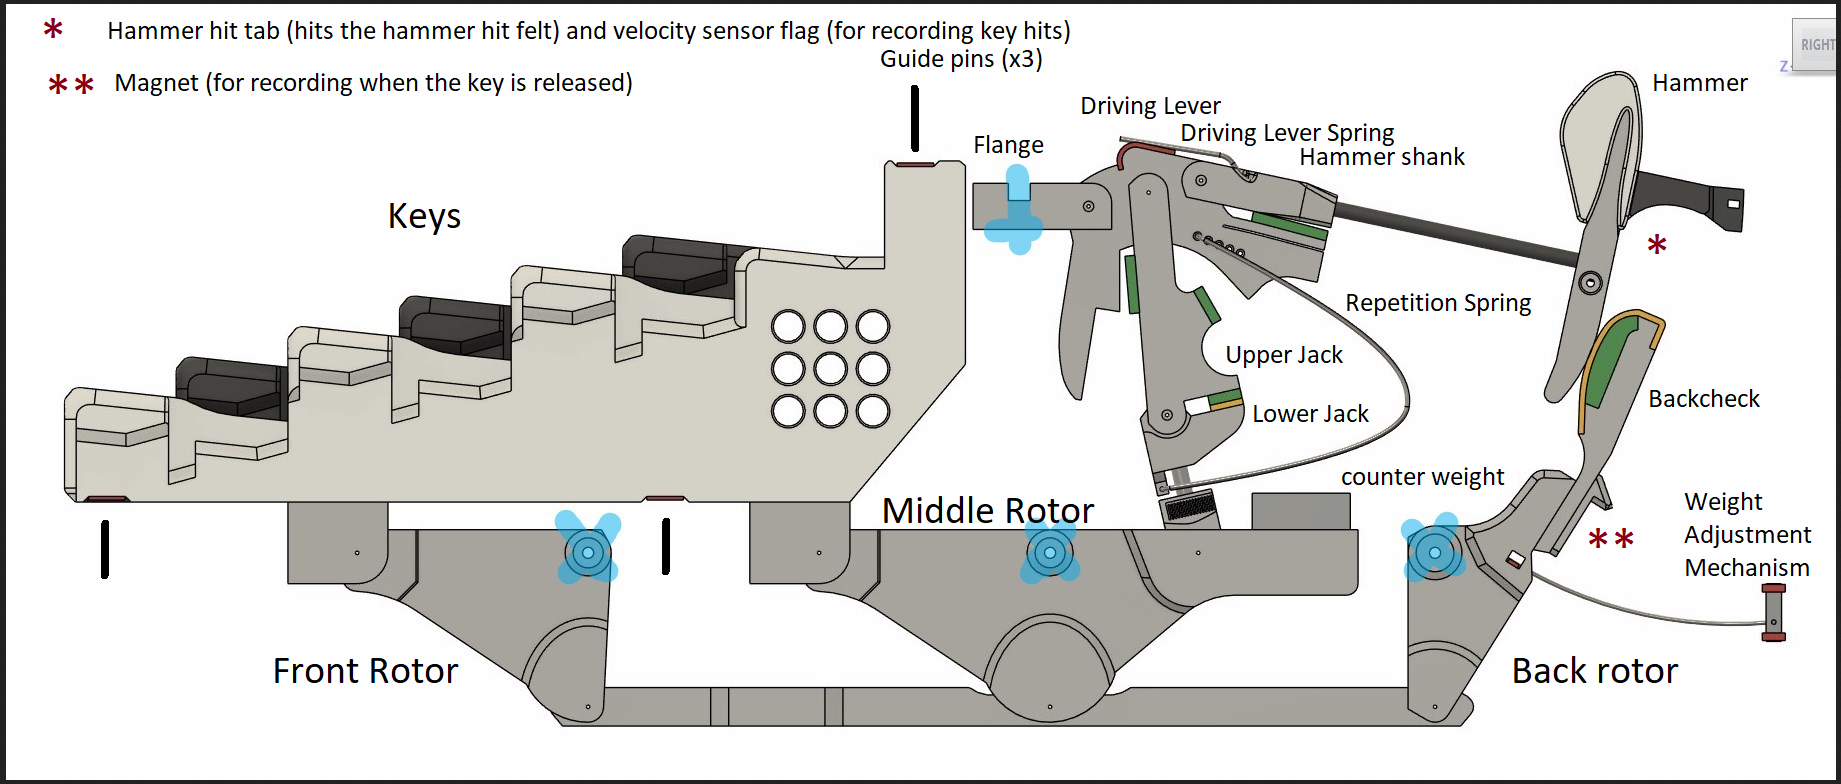
And here is my action with labels. The blue X marks are where the action is connected (via center pins) to the frame, and the upside-down t is where the flange is screwed to the frame.


Now to try and answer your questions:

  1. I set up the convoluted rotor assembly for the keys because I wanted the entire action to fit a more compact space and thus couldnt fit a full key lever. You can refer to the hickman action picture above, but the actual pivot point would be much further towards the right. It is also because of this that I needed to add a second rotor for the backcheck, because otherwise the backcheck would move way too far (since my 'key lever' rotates much more than a regular piano, closer to 8 degrees as compared to under 3 degrees of a grand piano). The vertical displacement however is the same - 9.5mm key dip, and around 6mm capstan movement.
  2. See the action image above. When the key is pressed (10mm), the front and middle rotors rotate. The middle rotor then pushes up on the jack, which pushes at the driving lever (which is connected to the flange), which in turn rotates the hammer. The backcheck is attached separately to the back rotor, since if I attached it to the middle one it would move way too far.
  3. Yes, I removed the two regulation screws that adjusted the maximum hammer height and the start of letoff. I didnt have enough space (due to the keys) to fit the screws while having access to them, which was further compounded by the shrinkage of the action from ~16mm wide (grand piano) to 9mm wide (my piano) due to the 5.1 inch octave span. I ended up regretting this decision as while the start of letoff isnt as important (in my case - essentially I per-calibrated that value and just print the parts to sub 0.1mm accuracy), but the maximum hammer height is still vital and I had to add an extra screw for that, though I added it to the point in the driving lever where the hammer shank rests on. The repetition springs are regulated the typical way (press on them), but also have 5 positions on the driving lever for when larger adjustments are needed (to account for different hammer weights).
  4. Yes, they are car wheel balance weights and act as key-counter weights. In the new version (top) I removed half of them and replaced them with a spring based system as that is what was originally used for hickman action and allows for adjustable key-weight by the player (turn the dial, change the action from light to heavy weight! said their advertisement papers).
  5. This was my 8 key prototype, so I selected 8 keys from the full 88 key range to try and see how the action will behave throughout the entire range. So I have keys 1, 13, 23, 37, 49, 61, 73, 88.
  6. The 8 key prototype is 86.4mm wide, which ends up being 129.6mm for an octave (or 5.1 inches)

RIP

Mike Filip Well, the entire hickman action is a rabbit hole in and of itself

Welcome! I'm having big troubles trying to following you. If I can, I suggest spitting this thread in at least 3 (if not more) separate ones, as I have done with my own series (the last one of which is available here )

So I suggest at the very least four threads: Janko, Hickman, 3D printing and electronics. Each one of these is a huge topics on its own, and making a single thread with all of them together makes it very difficult to discuss.

For example, I was very interested in Janko for a while, but then I realized its big shortcoming and the reason why (IMHO) it never took off and how the regular piano layout is IMHO much better. On the other hand, some of its mechanical design (a variation of the parallelogram structure) can be very interesting for regular piano layout too (and in fact @dore_m and I are exploring that). But that's a huge conversation in its own.

The Hickman action seems interesting, but I'm having troubles wrapping my head around it. In my opinion, studying patents to understand how something works is a lost cause: they are written by lawyers from lawyers. Even the animations are not illuminating me. For example, I see how the thing move in the mmdigest animation page (or YT video). Yet, I don't understand why the red jack is made of two parts and why the cyan part "breaks" it in the way it does. This is the crucial point of all this action, otherwise this would be simply a Cristofori action.

Finally

Mike Filip I have plans to release the fusion 360 files along with the electronic board designs (made in easy eda), though at the moment its all just stored locally on my computer (or at least as 'locally' as fusion 360 and easy-eda with their cloud storage can be). I think I can make them 'publicly viewable', but doing anything like that is just extra work on top of this project so it depends on when I get around to it.
As I got tired of writing over and over: the best sharing is the initial sharing since others can help you improve your design (not saying that I could do that with your project, just saying that someone could), in the same way that you can help them. That is what I did and continue doing. I am always perplexed when people say things like this which imply that you need to polish things to share as if they were a final product…. so I nudge you to do that sooner rather than later (and by the way, looking at your project it appears you are already almost done!!! Congratulation, which I should has said earlier in the message 😉 and welcome again)


vagfilm

Mike Filip Thanks for your detailed answers. I had already found the youtube series about the M&H restoration. I will digest your information and most probably get back with a few more questions😊.

One note though… mu question 8 was not about the octave width (or the full width of tje prototype) but about how deep it was (ie, from front of the keys to the enclosure backside).


Mike Filip

vagfilm The piano size is going to be 121cm long (950cm of which is the keybed, ~13cm per octave), 470cm deep, and 220 cm high. The size unfortunately doesnt fit into any hard (or soft) cover piano bags/cases, so in order to be able to transport it I will have to order a custom hard case… not sure where yet.


vagfilm

Only 47 cm deep? That is not bad at all…


CyberGene

Mike Filip sorry for the slightly awkward and offtopic question but seeing your name written as Mihail Filippov on the PCB and someone mentioning you’re from Moldova, are you a Bessarabian Bulgarian?


Mike Filip

CyberGene Dont think so? I consider myself to be 'from Russia', mainly due to Russia being the country most familiar to people as opposed to Moldova, my mom being from there (or more specifically, the Rostov region) and the fact that I speak ( & read & write) Russian as my first language, though English is my 'primary' language nowadays. More specific than that I cant exactly say.


CyberGene

Mike Filip ahh, makes sense. There’s some overlap between Russian and Bulgarian names which is why I often think someone must be Bulgarian but he’s in fact Russian 🙂 I know we have a Bulgarian minority in Moldova and Ukraine that are called Bessarabian Bulgarians and I have many such friends which is also why I thought you might be a Bulgarian.

Apologies for the offtopic. Again, your project and attention to detail is amazing, I’ll be following your journey with great interest! Thank you for joining and I hope you find our forum a good place for sharing thoughts with like minded people 🍻


Mike Filip

Started posting the videos going over the project, with just the introduction for now, but the next two episodes talking about the janko layout and the hickman action should be going up in the next couple days.

@RIP mentioned that it might be a good idea to split this post into a couple threads, so I think I will do that. I will keep this as the 'main thread' where I will publish links to the videos, answer questions, and provide photos as updates, but once the next episodes are up I will start new threads for the janko-layout and the hickman-action to go more in depth about them, along with narrowing the scope of the conversation.

The videos after that will cover the design followed by the electronics, so those will get their own threads too.

For now though, here is the introduction video.


dore_m

@Mike Filip Thanks for the video series. Easier to digest, and great job explaining.


Mike Filip

Posting the video about the Janko layout - going to start a new sub-thread focusing on the janko key layout (and to a certain extent isomorphic layouts in general) as compared to the classical piano layout.


Next Page »